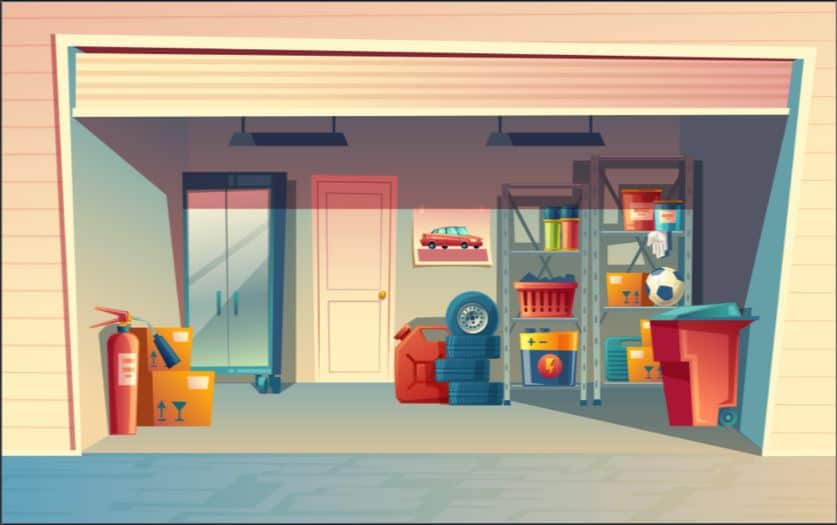
A garage can look like a dream or a nightmare depending on your technique of storage and organization. Below we will discuss some simple tips and strategies to help get your garage organized and looking like a well-kept department store and some more hands-on DIY projects to customize your garage to fit your style and storage necessities.
TIP 1: Clear the Clutter
This may seem like a no-brainer, but it is the first step in getting your garage in shape. It is going to give you more space to move around and a better idea of what you actually still need to store and organize neatly. You may need something a little bit bigger than your average trash can to throw away the shocking amount unused, unwanted and unknown stuff that you never would have guessed made it to your home. This will save you money in the end. Consider renting a dumpster to clear out the junk and avoid making several trips to the landfill.
TIP 2: Blue Print the Room
Failure to prepare is preparing to fail. Though not as serious in this case as some, the saying applies when organizing your garage. So, grab a sheet of paper and a pencil, and blueprint your garage set-up. Power tools on the east wall, rakes and shovels on the west wall, snow blower next to the refrigerator, tarps in the rafters and so on. Once you have an idea of where you want things then start placing them in the designated areas. It’s not so important to specifically organize your tools in alphabetical order or from biggest to smallest yet.
TIP 3: It’s in the Details
Once you have your rough layout of the room, then choose a section to neatly begin organizing your garage. Don’t move on to the next section until you complete the section you are working on. Otherwise, you will prolong the process of having a nice and tidy garage. In this step it may be beneficial to grab a sharpie and duct tape to label what exactly is going where, as you go. Let’s take our wrenches and pliers for example. If you have a big toolbox with drawers galore, then neatly place your sockets and socket wrenches in one drawer and label it with your tape and marker. Move on to your pliers and do the same. Allen wrenches, channel-locks and so forth.
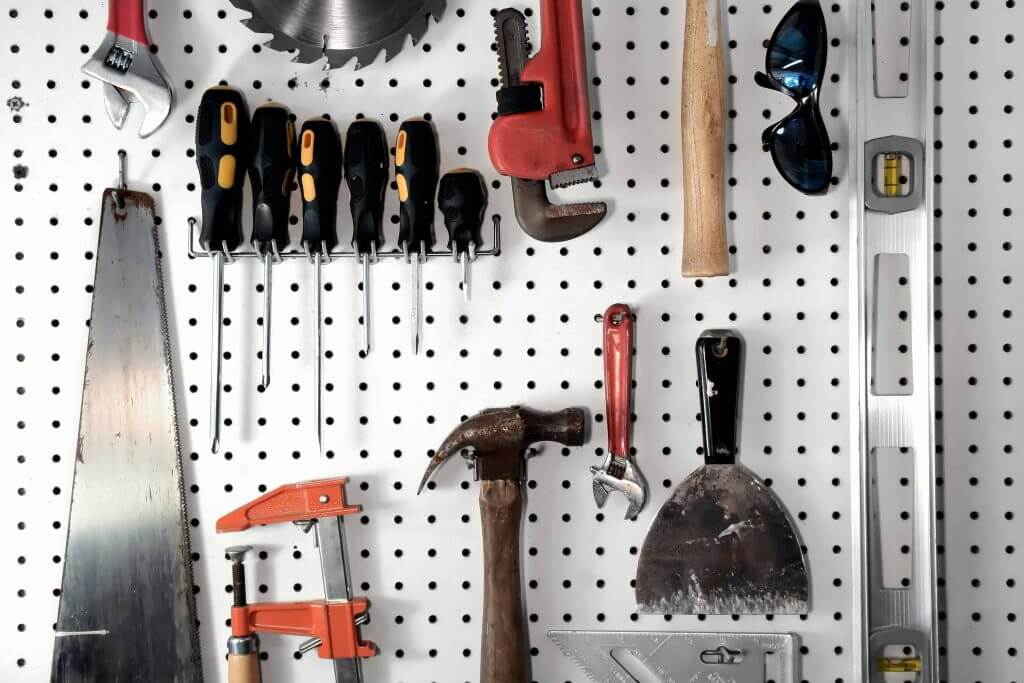
If you do not have the “Deluxe Tool Box 9000” with eighty-seven drawers and a robotic, voice-controlled bottle opener, then you can opt for a good and simple pegboard and hooks. This is a cost-effective option to neatly organize your tools by hanging them up in plain sight for easy access. And again, keep the tools in order. Just like you sectioned off the garage, you can also do the same with your pegboard tool rack. Saws to one side and wrenches to another. You get the pattern.
To be sure that your pegboard can hold the weight of your tools be sure to build wooden braces along the backside that you can fasten directly to the wooden studs of your garage walls. Make sure your braces don’t interfere with where you want to place the hooks to hang the tools.
TIP 5: Speaking of Studs…
There are a few simple and very cheap tricks to utilize the studs in your garage as long as they are uncovered, which a vast majority are. Simply nailing or screwing a 1-inch by 2-inch piece of wood to the studs, running perpendicular to the vertical 2X4 frame. For thin tools such as rakes and shovels this makes great, compact storage with little effort or modification. You could even go as far (or rather not so far) as using a screw in each stud and a string attached to one screw and a loop on the other end, that can unhook form the opposite screw for easy access.
TIP 6: Storage Bins
For the other items that don’t fit between your studs on your tool rack, you may want to consider some storage bins. Sleeping bags, camping stoves, pots and pans, tackle boxes, tents and whatever else you deem a viable option to store in the storage bin. Have your Tape and marker handy to write the contents on the box. Holiday decorations, such as lights and small props and ornaments are other goodies to store in these bins.
If you are storing string lights then store them in a coil and use electrical tape to help them hold their shape and not turn into the tangled mess that is inevitable when you store them improperly. Two wraps of tape on opposite ends of the light string coil should hold the circular shape but four wraps will be best. TIP INCEPTION… You can layer your storage bins with foam to keep fragile items from breaking.
TIP 7: Rafters and Plywood
This tip is self-explanatory but is very underutilized. By placing and securing plywood to the rafters above you give yourself immensely more space to utilize for storage and organizational purposes. Get a suitable partner to help you with this task. You can toss those storage bins right up there and those winter sleds that get used 2 or 3 times and they will be out of sight and most importantly out of the way.
Give yourself easy access to the storage up above, so you don’t have to plan your escape and trap yourself in the rafters. This is also the perfect spot to store your winter sports and winter hobby accessories such as snow boards, skis, snow shoes and snow suits. Mice and spiders love warm insulated places during the cold especially, so keep those boots and suits covered.
TIP 8: Enter the DIY-ers
If you love DIY projects and have the time and resources, then some of these projects below will be just for you.
DIY SHELVES
Think of this like building a 4-legged table, but with every added shelf you are adding another table top. This will be especially useful if you have a finished garage and cannot store up in the rafters. Make sure that whatever it is that you are wanting to store on the shelves will fit. If you are using the storage bins to put on the shelves, then measure the dimensions of those bins times how many you have and add an inch or so for play room on the dimensions of the standing shelves.
Depending on how many bins you have and how much space for shelving you have the size and number of the shelves will be dictated by that. The closer you can keep the shelving to a square shape the more efficient you are being with space use. If you have 12 bins to store, then you take up a lot of space by lining them along the wall. Instead you could build a shelving unit that has 3 layers of shelves that is wide enough for 3 or 4 containers. You could then stack them accordingly (4 wide by 3 high) and have either the top shelf left over or the space beneath the first shelf left over for even more storage. This DIY will immediately organize your garage and completely change the vibe from disorganized chaos.
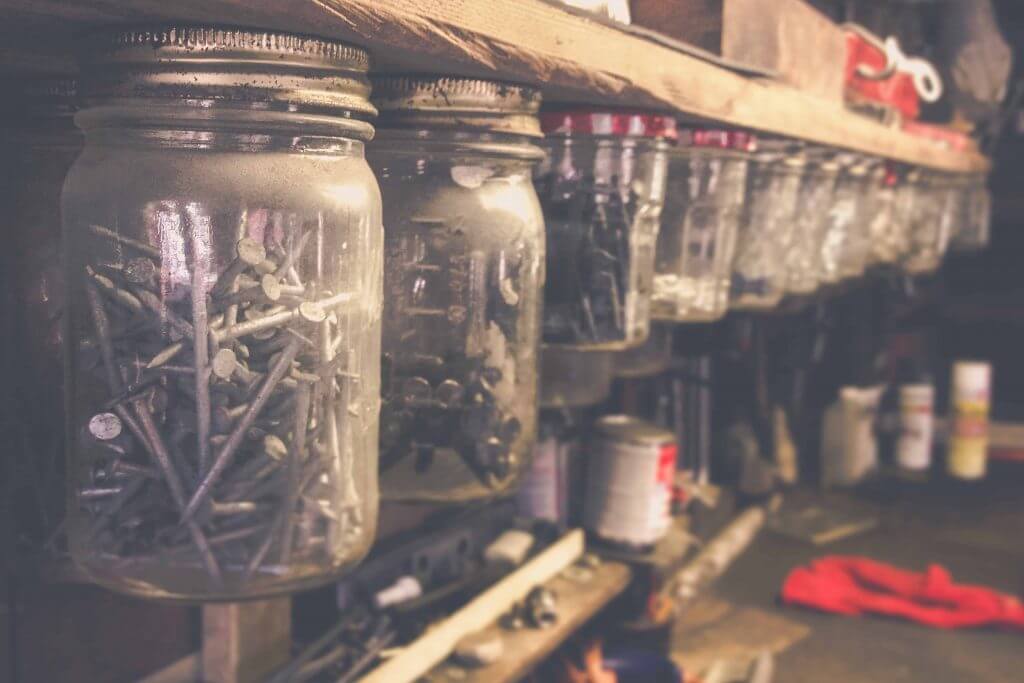
DIY SCREW, NAIL AND MISCELLANEOUS ITEM HOLDER
We all have those random and scattered parts lying around the garage that we don’t want to toss out but don’t know what they are for, so we keep them on a cluttered pile on our workbench or maybe in a cardboard box on top of the fridge. With this DIY those days are over. First decide on if you want glass or plastic jars. Mason jars work great but so do old plastic PB&J Jars (once you have cleaned them out). Either way, you need to have the lids for said jars, a board to screw them into and a place to mount the board to allow the jars to be hanging.
Simply place the lids top-side-down on the board and drive one screw through the center of the lid and into your board you are using. Make sure that the screw is long enough to get a good grip and hold but no so long that it is sticking out the top side of the board. Once you have those lids mounted securely to the board then you can mount the board to a workbench, call or cabinet. Place the items in the corresponding jar and then twist the jars into their lids. Now you have your nails, screws, paperclips, clothes pins, thumb tacks and whatever the heck else you found worthy of inhabiting a hanging jar compartment. The best part is that now it doubles as another shelf for smaller items.
DIY HANGING RACK
This is a very basic DIY that anyone can do. All you need are screw-mounted hooks to drill into your studs to hold whatever you want. Coats, muddy boots, Bad Milton rackets, extension cords, Christmas lights, rope, cable, bungees, tow straps, fishing nets and anything else you might want to hang up off of the floor. You can have fancy coat hooks or basic, plastic coated screw-in hooks that your bikes hang from in your parent’s garage.
Before you know it, you’ll be looking at your organized garage and won’t want to look away. Once your garage is organized, you’ll be amazed at how easy it is to keep it that way. Good luck and happy organizing!