Replacing old or damaged ceramic tile flooring can do wonders to update your living room, kitchen or home décor. Even if only a few tiles are cracked or damaged, it can be easier to remove an entire floor than to try to replace a few tiles especially if you are working in a small space like a bathroom. The results will be better, too. It will allow you to update the style and finish of your tile floor.
“You’re saving money that you can now put toward new tile or new fixtures.”
So, the work is worth the time. Removing ceramic tile doesn’t take specialized skills and is a great DIY project. But it does take some simple hard work to get tile demolition done. This guide will show you how to remove tile flooring easily and safely no matter your skill level.
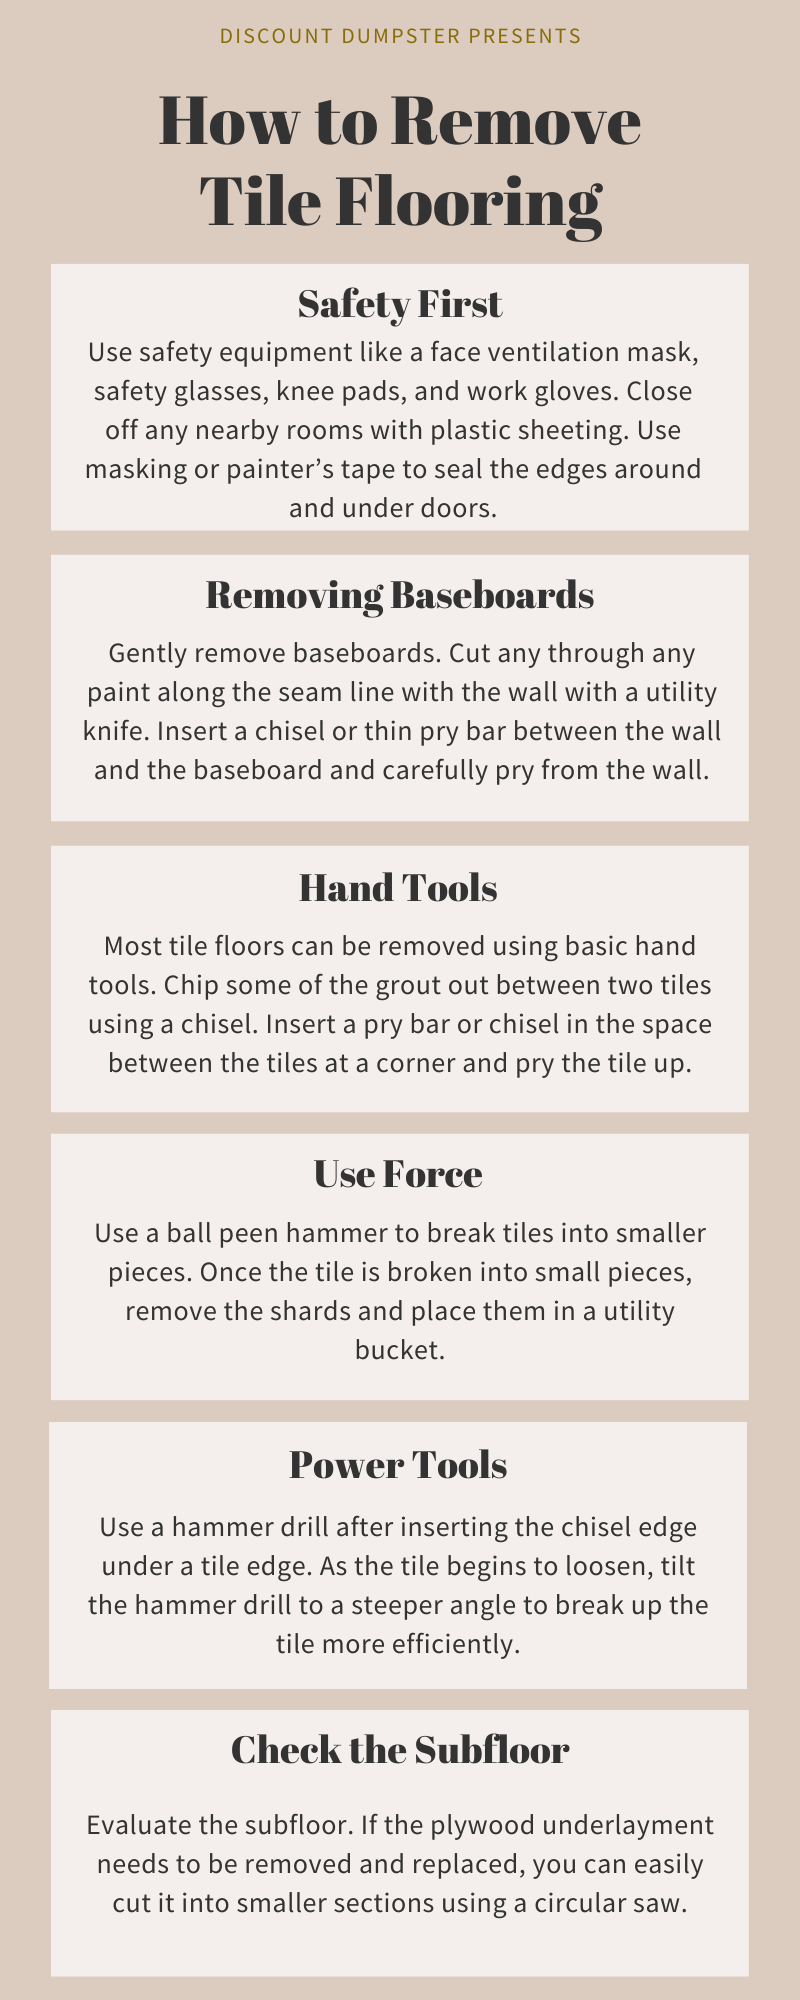
Removing ceramic tile or porcelain floor tile can generate a lot of dust and small tile shards. Plan for safety. When breaking up and removing tile, you should use safety equipment like a face ventilation mask, safety glasses, knee pads, and work gloves. Close off any nearby rooms with plastic sheeting. Use masking or painter’s tape to seal the edges around and under doors. This will keep these thin, sharp shards from damaging neighboring floors.
Remodeler Tyler Grace suggests protecting any nearby floors “all the way from the room getting demoed to the door you’ll use to get to the dumpster. That way, any debris that gets stuck to your shoes won’t get ground into carpets or scuff wood or tile.”
If you are working on a bathroom demolition, be sure to cover mirrors and glass shower doors with a drop sheet to prevent damage from flying ceramic tile pieces.
Removing Baseboards
Remove any vent covers. Gently remove baseboards. First, cut any through any paint along the seam line with the wall with a utility knife. Insert a chisel or thin pry bar between the wall and the baseboard and carefully pry away from the wall.
How to Remove Ceramic Floor Tiles
Hand Tools
Most tile floors can be removed using basic hand tools. Chip some of the grout out between two tiles using a chisel. Insert a pry bar or chisel in the space between the tiles at a corner and pry the tile upward.
In some cases, the tile will easily pop out. If this is the case, then use a long-handled floor scraper to remove several tiles at once. You can wedge the blade of the floor scraper under the edge of a tile and use a forward sweeping motion to get under the tiles and pop them up.
However, if the tile will not easily come off of the floor from your basic hand tools, you may need more force. Use a ball peen hammer to break tiles into smaller pieces. Once the tile is broken into small pieces, remove the shards and place them in a utility bucket. When a bucket gets full, transfer the broken tile pieces to a heavy-duty contractor trash bag to contain the pieces, as they will tear through a regular trash bag. Do not fill the trash bags all the way up, as they will get too heavy to manage.
As you move along the floor, continue to insert your chisel or pry bar under the edge of an adjacent ceramic tile. Use the hammer to tap the chisel under the tile until the tile breaks or pops free. Continue breaking up and removing tiles until all the flooring has been removed.
Take care if removing porcelain tile. It's very fragile. Also, make sure there's no asbestos fibers in the tiles. If so, consult a professional.
Power Tools
If you are removing a large area of tile, you can use power tools to make the job quicker and easier. A hammer drill with a chisel attachment will break up the tile and loosen it from the backer board. Hammer drills can be rented if you don’t have one. Power tools are worth the money if you have a big tile floor to tackle. To use a hammer drill, simply insert the chisel edge under a tile edge. As the tile begins to loosen, tilt the hammer drill to a steeper angle to break up the tile more efficiently.
If your tile was installed on a cement backer board, you should remove that too. In general, cement backer board is not worth trying to save and reuse again, as it usually is damaged when removing the tile. Backer board is relatively inexpensive, so plan to remove it and replace it with new material when you install new floor tiles.
Clean Up and Disposal of Ceramic Tile Flooring Demolition Debris
Dumpster Rental
Arrange for a dumpster rental on site to dispose of flooring material and old tile before starting your demo work. Dumpsters come in small sizes that are perfect for a tile removal project. Trying to put heavy tile shards in your regular trash is messy and can be dangerous. The floor tile is heavy and sharp along the edges.
Your best approach is to clean up broken tile as you work on your project, keeping your work area clean and safe. Stop frequently to use a shop vac to collect small fragments and dust on the floor from the tile demolition.
Return Power Tools
If you rented power tools or other equipment to aid in removing your floor tiles, make sure to return them.
It is a common practice to install ceramic tile over other flooring types, such as vinyl, linoleum, or hardwood floor. So you may find another layer under the tile floor you remove. You can use a floor scraper to peel up these additional layers. This will get you down to the plywood subfloor, or possibly a concrete floor. Once all the ceramic tile floor and other layers are removed, you should evaluate the subfloor or concrete slab.
“If the (plywood) subfloor is in good condition, no evidence of moisture, mold, warping or wood crumbling, just make sure it’s smooth and level and give it an extra good cleaning,” advises professional contractor Mike Holmes of the DIY Network series “Holmes & Holmes.”
However, sometimes a subfloor is not in good shape. Any squeaky joints, sunken areas, or water damage need to be addressed. If the plywood underlayment needs to be removed and replaced, you can easily cut it into smaller sections using a circular saw. Once it is cut, use a pry bar to pull up the cut sections. To prepare for new tile installation, you will want a strong and intact plywood underlayment subfloor. Use new cement backer board under a new tile installation. The better you prepare the foundation for your new tile floor, the better the result of your flooring project.
Table of Contents Why Should You Build a Deck? How Easy is it to Build a Deck? How to Build a Deck in 10 Steps 1. Plan for Precision 2. Gather Your Tools 3. Pour the Concrete and Place Deck Footings 4. Cut and Lay Out Your Joists 5. Prep Your Planks 6. Lay Out […]
Table of Contents Is Front Yard Landscaping Worth It? 1. Improve Curb Appeal 2. Increase Property Value 3. Create a Serene Environment 4. Habitat for Local Plants and Wildfire 5. Aesthetics and Comfort Top 10 Low Maintenance Front Yard Landscaping Ideas 1. Make a Statement with a Flowering Tree 2. Get Drought Resistant Native Plants […]