Let’s say you notice a couple damaged shingles on your lawn after a storm, or you see a small leak in a corner of one of your interior rooms. There may be some asphalt shingle granules collecting at the end of one of your downspouts. These are clues your roof is in need of repair.
When you have damage to your roof shingles, you’ll have to decide if you want to repair the damaged roof section or replace it completely. Really, you are deciding between spending less money now and buying some time until you get a full roof replacement, or taking on the big expense of a full roof replacement now.
Why Should You Replace Old Roof Shingles?
As a homeowner, one benefit of having good roof installation is to reduce ongoing maintenance. When a new roof is installed, you can expect it to last for years with little attention. Asphalt shingle roofs usually last about 25 years. Slate, tile, and copper roofs last at least 50 years.
However, as your roof ages, you may notice some areas of concern.
Your roof shingles may be damaged by hail, strong winds, or falling tree limbs. Even worse, your roof may begin to leak or shingles may begin to fall off completely, leaving areas of your roof exposed.
While you may not have to think about your roof much when it is intact, if it needs repair, it becomes a crucial home repair - one you can’t put off. Any delays in repairing your roof could cause serious water damage from leaks into your home, leading to damaged ceilings and walls, mold growth, and wet insulation.
It could also rot the wood sheathing of your roof and in structural damage. You’ll be faced with the cost of both a roof replacement and interior water damage repair. A damaged roof can also affect the property value of your home.
Watch the Health of Your Entire Roof
Missing or loose shingles are one of the first signs your roof needs to be repaired. Water leaks in your home also indicate inadequate roof protection. “When you notice your shingles start to curl or become discolored, and there are shingle granules at the bottom of your downspouts, it may be time to consider repairs,” explains Jim Miller of Roofing and Sheet Metal Inc.
Do a close inspection of your roofing. Look for broken, damaged, or loose shingles. You can mark shingles that need to be replaced with chalk. Watch for loose or damaged flashing along the roof edges. These sections of step flashing may need repairs as well.
Cost of Shingle Replacements
According to Roofing Calculator Inc., minor roof shingle repair can run from $150 to $400 for a small area of roof. You’ll be looking at costs up to $1,200 for moderate repairs. If your roof needs extensive work, costs can run to $3,500 or more.
If the cost of repairing your roof goes over this amount, you should seriously consider replacing your roof rather than just repairing it. Since the average cost to install a new roof is about $7,500 to $9,500, you would have spent almost half that in repairs. A roof that needs that much repair work is probably not going to have years left.
Of course, you can save money by doing the repair work yourself. If your roof has loose or peeling shingles, or bald spots on the shingles, you can easily take care of these issues.
Beware, there may be other underlying issues, so it never hurts to have a roofing pro take a look before repairing your roof.
Roof Repair Safety Tips
USA Today reports roofing is the fourth most dangerous job in America. Working on a roof “is physically demanding because it involves climbing, bending, kneeling, and heavy lifting,” explains the Bureau of Labor Statistics (BLS).
Before beginning any roof repairs, you should understand it is physically challenging work. Take some safety precautions:
Consider the slope and height of your roof. Working on a very steep or high roof requires extra safety equipment to prevent falls.
If your roof is unstable or has soft spots, do not attempt the work yourself. There could be a risk of collapse.
Never work in inclement, rainy, snowy, or windy weather.
Be certain of your ladder placement Secure the feet and the top of the ladder.
While on the roof, always be aware of the edge. You could lose track of your position while working.
Only use the proper equipment for roof repair including proper personal protective equipment.
Ask a friend or family member to help you so you have someone to stabilize your ladder and get any tools or material you need.
Tools Needed for Roof Shingle Repair
Heavy gloves
Eye protection
Knee pads
Ladder
Flat prybar
Hammer
Utility or roofing knife
7/8” roofing nails
Roof cement or sealant
Methods for Replacing Roof Shingles
Before beginning your roof repair, check with your local city building department to find out if a permit is needed. For minor roof repairs, you’ll usually find that you don’t have to pull a permit.
If you are repairing your roof as part of an insurance claim, talk with your agent to find out how to get reimbursed for repairs you complete yourself. Then you can begin the work of repairing your roof:
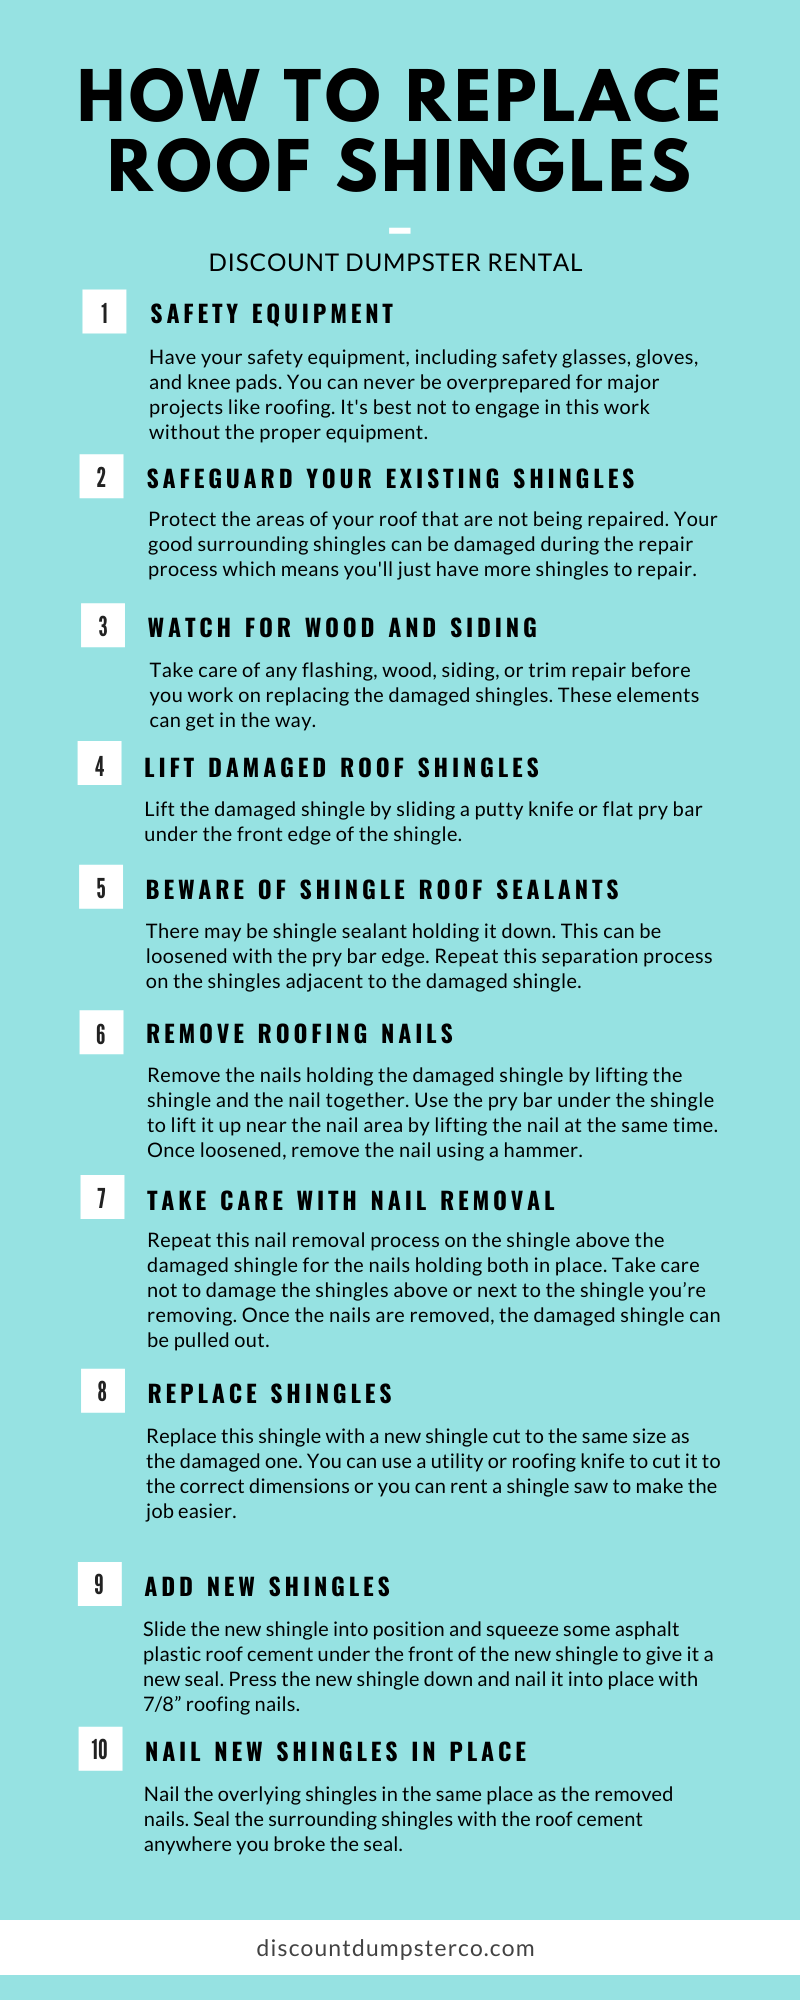
Have your safety equipment, including safety glasses, gloves, and knee pads. You can never be overprepared for major projects like roofing. It's best not to engage in this work without the proper equipment.
2. Safeguard Your Existing Shingles
Protect the areas of your roof that are not being repaired. Your good surrounding shingles can be damaged during the repair process which means you'll just have more shingles to repair.
3. Watch for Wood and Siding
Take care of any flashing, wood, siding, or trim repair before you work on replacing the damaged shingles. These elements can get in the way.
4. Lift Damaged Roof Shingles
Lift the damaged shingle by sliding a putty knife or flat pry bar under the front edge of the shingle.
5. Beware of Shingle Roof Sealants
There may be shingle sealant holding it down. This can be loosened with the pry bar edge. Repeat this separation process on the shingles adjacent to the damaged shingle.
6. Remove Roofing Nails
Remove the nails holding the damaged shingle by lifting the shingle and the nail together. Use the pry bar under the shingle to lift it up near the nail area by lifting the nail at the same time. Once loosened, remove the nail using a hammer.
7. Take Care with Nail Removal
Repeat this nail removal process on the shingle above the damaged shingle for the nails holding both in place. Take care not to damage the shingles above or next to the shingle you’re removing. Once the nails are removed, the damaged shingle can be pulled out.
8. Replace Shingles
Replace this shingle with a new shingle cut to the same size as the damaged one. You can use a utility or roofing knife to cut it to the correct dimensions or you can rent a shingle saw to make the job easier.
9. Add New Shingles
Slide the new shingle into position and squeeze some asphalt plastic roof cement under the front of the new shingle to give it a new seal. Press the new shingle down and nail it into place with 7/8” roofing nails.
10. Nail New Shingles in Place
Nail the overlying shingles in the same place as the removed nails. Seal the surrounding shingles with the roof cement anywhere you broke the seal.
Final Cleanup after Your Shingle Replacement
Working with roof shingles can generate hazardous debris. Clean up well after your shingle replacement work. Pick up and bag all the shingle waste. Collect all the nails you can see; then, use a magnetic sweeper to pick up any stray nails.
If you are replacing a large section of roof, you may find using a small rental dumpster is easier than bagging all your old shingles and hauling them to a landfill yourself.
When It’s Time for a New Roof
If your attempts to repair your roof aren’t enough, it may be time for a roof replacement. If you want to extend the life of your new roof, you can consider replacing it with a different type of roofing material. On average, these are the typical lifespans of different roofing material:
Asphalt shingle roofs: 10 to 25 years
Premium asphalt shingles: 25 to 50 years
Wood shingles and shakes: 20 to 30 years
Metal or steel roof: 50+ years
Slate, clay, or concrete tiles: 50 to 100 years
Of course, you will pay more for premium, long-lasting roofing materials. The initial cost may be high, but you get more value over the long run. If you plan on staying in your house for the next few decades or live in an area with hurricanes, tornados, or other extreme weather, talk with a roofing professional to find out if a premium material roof is the best choice.
Table of Contents Why Build a Privacy Fence? Top 7 Privacy Fence Ideas 1. Wooden Fence 2. Metal Fencing 3. Bamboo Fence 4. Vinyl Fence 5. Chain-Link Fencing 6. Brick or Concrete Fence 7. Natural Fence Privacy Fences Add Utility and Value In the poem “Mending Wall” Robert Frost wrote, “Good fences make good neighbors”. […]
Table of Contents How Does Bidding Work? How to Successfully Bid a Roofing Project 1. Thoroughly Assess the Roof 2. Understand the Scope of the Job 3. Take Good Measurements 4. Determine Materials Costs 5. Calculate Labor Expenses 6. Add in the Extras 7. Agree On a Clear Timeline 8. Watch Out for Overhead Costs […]