While your sprinkler system may seem like a set-it-and-forget system, it actually needs maintenance to stay in good working order. Shutting down your sprinkler system in the fall in preparation for the winter months is essential each year. This is particularly important in areas of the country that dip below freezing in the winter. The best time of year to winterize your sprinkler systems is before the end of October in most parts of the country. Some homeowners choose to hire a professional to winterize their system, but it is not difficult to do the job yourself.
Continue reading to learn how to winterize your sprinkler system.
Why Should You Drain Your Sprinkler System?
Winterizing your sprinklers keeps the system from becoming damaged due to freezing temperatures. As the ground freezes, the frost level extends below the depth of the installed piping system and can affect your sprinkler lines. When water remains in a sprinkler, it will expand in freezing weather. According to Colorado State Extension, “Water expands and increases in volume by one-eleventh. So, 11 cubic feet of water will form approximately 12 cubic feet of ice.” This can lead to the pipes bursting and rupture of the pipe walls.
And it’s not just water in the PVC piping. Water left in the backflow assembly can expand to cause the brass body to crack, which will damage the internal components. Lorenzo Sanchez with Senske Services explains, “You should try to get all the water out of the sprinkler lines. That way it doesn’t swell up in the winter and cause any cracks or breaks. You’ll get a longer life out of your system.”
You won’t know this happened until the spring arrives, and you try to turn on your sprinklers. You’ll soon realize there is a problem when water does not come out of the sprinkler heads correctly. You’ll then need to find the location of the leak and have the hassle and cost of repairing those lines.
Repair of sprinkler lines due to damage from freezing can run into the thousands of dollars. Repair of just a short section of line and a couple of sprinkler heads will run about $200. If there is widespread damage or your system is large or set deep in the ground, repair costs will climb from there. So, it makes sense to take the time to winterize your system each year. “View the winterization process as an insurance policy,” says Russ Jundt of Conserva Irrigation. “An ounce of precaution and preventive maintenance will give peace of mind and potentially save thousands of dollars from a catastrophic event.”
Winterize Your Sprinkler System or Irrigation System
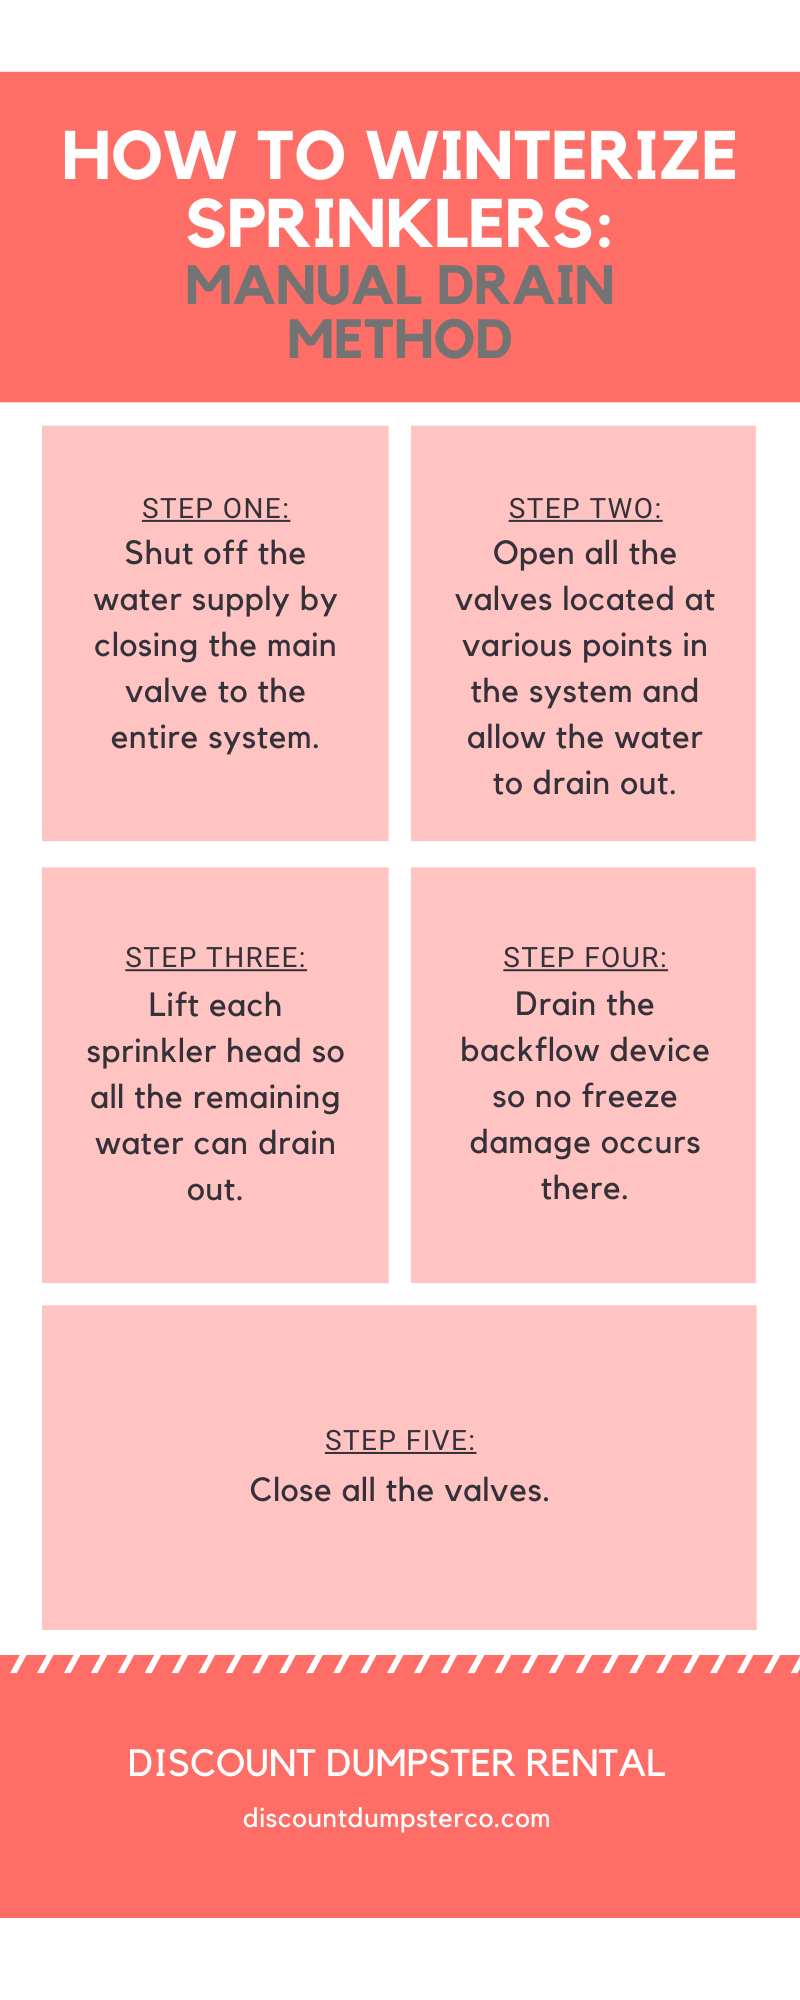
Manual Drain Method
Manual draining is the easiest of the methods. In a system equipped with manual drainage, you simply open up the manual drain valve and let the accumulated water supply drain out. This valve will be located at the ends of the system downstream of each zone and at the low points of the PVC piping system.
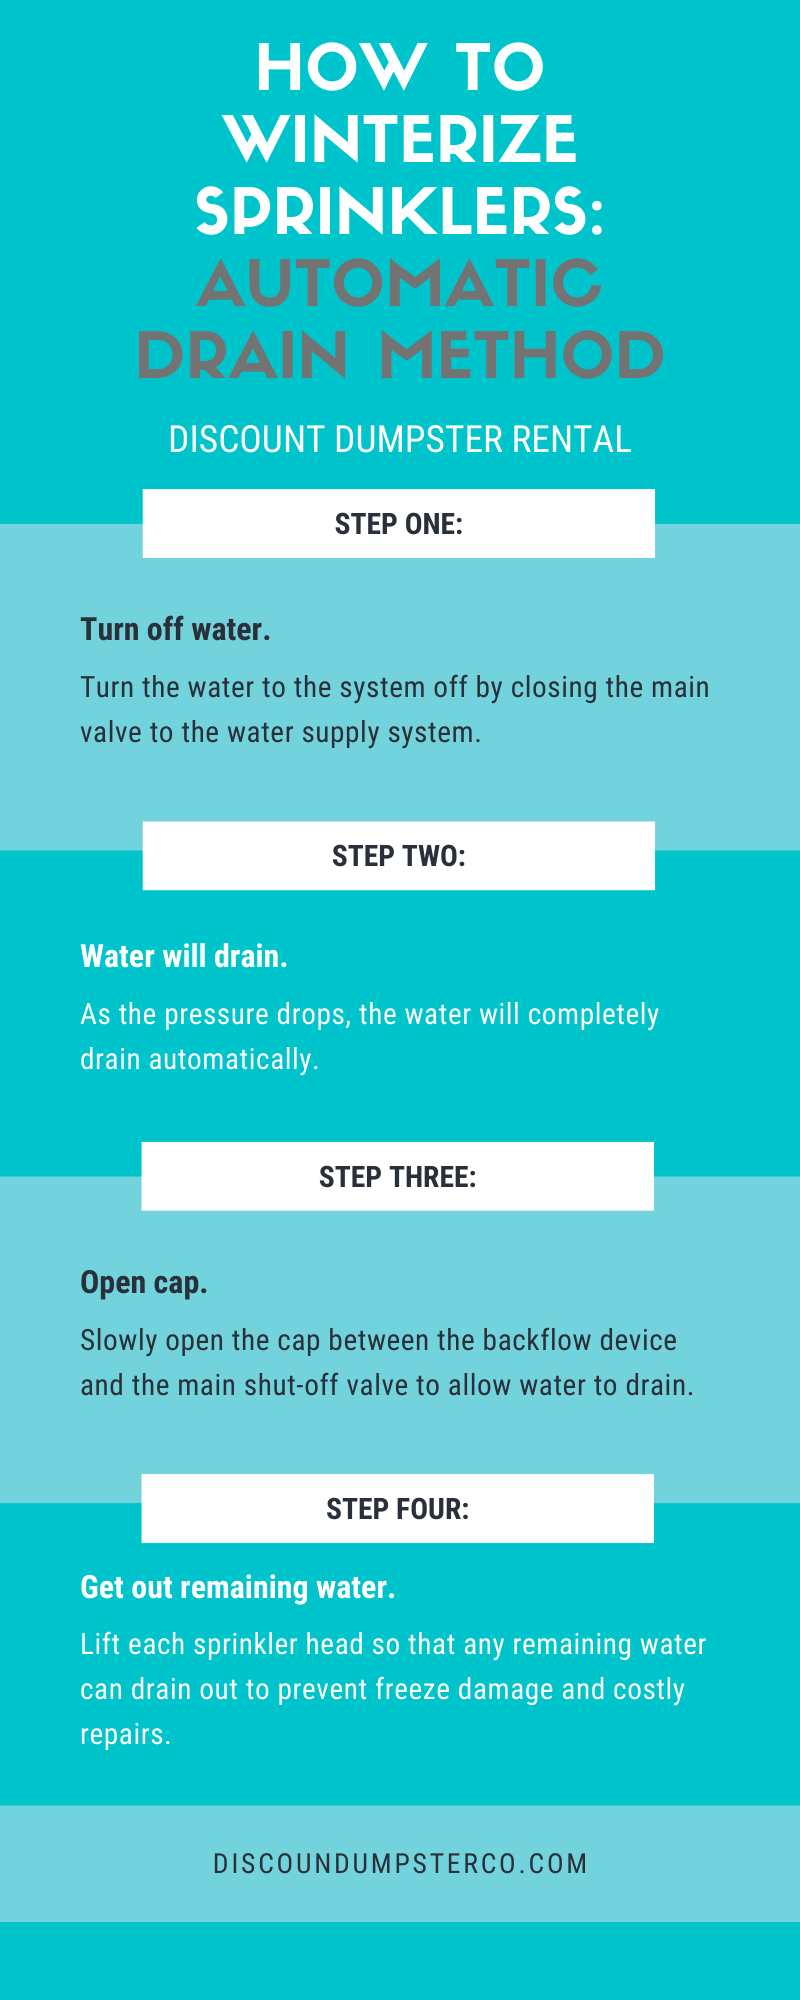
Turn the water to the system off by closing the main valve to the water supply system.
As the pressure drops, the water will completely drain automatically.
Slowly open the cap between the backflow device and the main shut-off valve to allow water to drain.
Lift each sprinkler head so that any remaining water can drain out to prevent freeze damage and costly repairs.
Blow Out Method
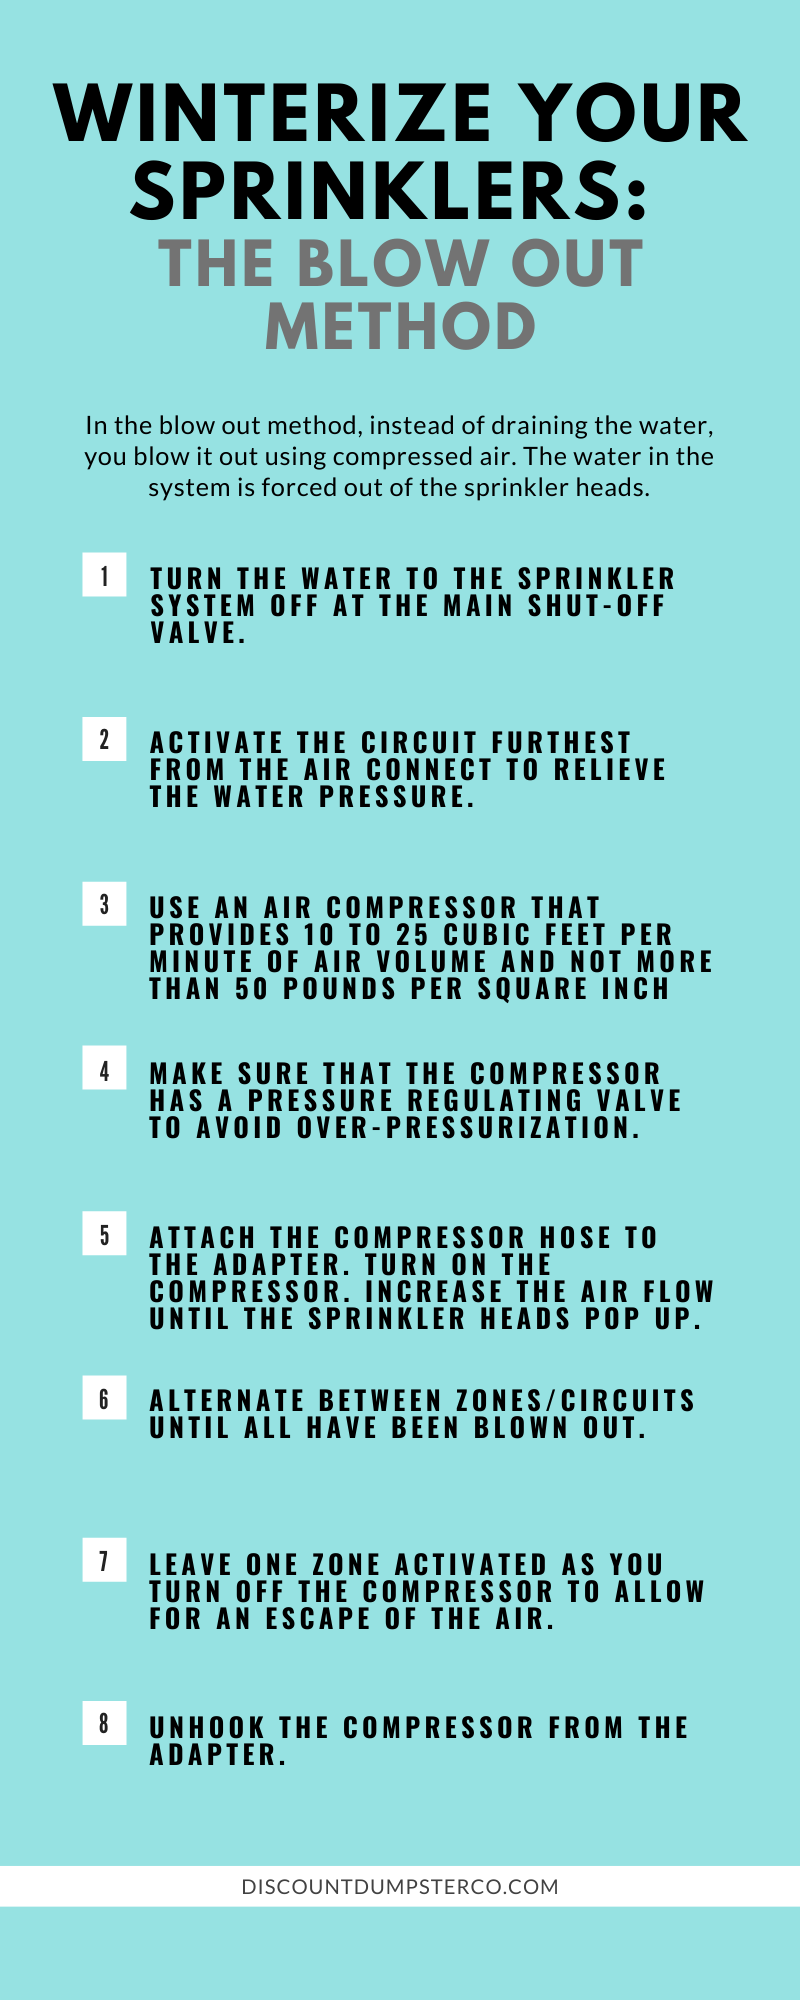
In the blowout method, instead of draining the water, you blow it out using compressed air. The water in the system is forced out of the sprinkler heads.
Turn the water to the sprinkler system off at the main shut-off valve.
Activate the circuit furthest from the air connect to relieve the water pressure.
Use an air compressor that provides 10 to 25 cubic feet per minute (CFM) of air volume and not more than 50 pounds per square inch (psi), which will give you high air volume and low air pressure.
Make sure that the compressor has a pressure regulating valve to avoid over-pressurization.
Attach the compressor hose to the adapter.
Turn on the compressor and gradually increase the flow of air until the sprinkler heads pop up.
Alternate between zones/circuits until all have been blown out.
Leave one zone activated as you turn off the compressor to allow for an escape of the air.
Unhook the compressor from the adapter.
Safety Precautions with the Blow Out Method on Your Lawn Sprinkler System
There are some risks with using the blow out method to winterize your sprinkler system. Excess pressure can lead to damage to your system if the pressure exceeds 50 psi.
Eye Protection
Excessive pressure can damage the lines and can result in flying debris. Always wear safety glasses for eye protection when using compressed air to blow out your sprinkler lines. Do not stand over any sprinkler components such as the valves or sprinkler heads when blowing out the system.
Use Correct Air Compressor to Limit Air Pressure
The most important safety precaution you can take is to ensure that you are using the correct air compressor for the job. Small shop compressors usually will not have adequate pressure to effectively remove all the water, and a large compressor may deliver too much air pressure and damage the system.
Do Not Run Compressor for Long Periods of Time
Do not run the compressor for more than two minutes at a time, as the heat buildup could damage your sprinkler system pipes. You can alternate zones or circuits, running each at two minutes, to allow for the heat to dissipate between blowouts.
Because of these issues, this method of winterizing your sprinkler system is often best left to a professional. They will have the proper air compressor needed to safely complete the job. If you get a professional to do the job, remember that you are among the many homeowners in the fall who are requesting this service. Be sure to call early enough in the season to get your sprinklers winterized before the first freeze of the season. Most blowout services cost between $75 and $250, depending on the size of the lawn.
Final Steps of Sprinkler Winterization
Regardless of which method you use, there are a couple of final steps that need to be taken to complete the winterizing process. The main shut-off and other valves need to be covered and insulated to prevent damage from freezing. You can use foam insulation tape to wrap them and then cover them with a plastic bag. Tape each bag to secure it. If you have any above ground piping, it should be insulated and covered in the same manner.
In a system connected to a domestic water supply, there should be a backflow prevention device attached. This also needs to be drained of any water and insulated in the same manner as the valves.
If your system has a pump, it should be drained out and removed. Store it inside during the winter months. If the pump cannot be removed, insulate it and cover it with a plastic bag to protect it.
Turn off the timer so that your system does not keep cycling. On some systems, you can set the timer to “rain mode.” This keeps the system from turning on, while saving your preset schedule so you can have an easy restart in the spring. If you don’t have rain mode, simply turn the system off. In this case, you will most likely have to reprogram your system in the spring.
Finally, don’t forget your drip systems in your garden and around trees. These lines will burst when exposed to freezing cold if there is still water in them. You can disconnect the drip system and allow the water to drain out. While the tubing is safe outside in freezing weather, the fittings can crack if frozen. So, store the tubing indoors during the winter months.
Winterizing Your Lawn
Leading up to the winterizing of your sprinkler system, you can begin to cut down on the amount of irrigation you’re doing. You should plan on watering the same amount, but increase the days between each sprinkler run, ending with a once-a-week watering schedule.
Your lawn will need a final mowing before winter sets in. Do one final watering before this last mowing. During the summer, your lawn should be cut high to allow for better root growth and less water use. But the final mow of the fall season should actually be shorter, about 2 to 2.5 inches long. Bag up the grass clippings rather than leaving the cut grass clippings on your lawn.
Finally, don’t heavily fertilize your lawn before winter. A light final fertilization will get your lawn through the winter months when it will be ready to start its spring growing season again. With all of these winterizing steps, your sprinkler system will be in great shape when warmer weather returns.
Table of Contents Why is Guestimating Important? What Kind of Roofing Tools Do You Need? How Many Bundles Should You Buy? 1. Asphalt 2. Metal 3. Tiles 4. Wood 5. Solar Shingles Know Your Bundles Your roofing materials are vital to your home’s structural integrity and the safety of the building. You want it to […]
Table of Contents Why is Window Removal Necessary? More Energy Savings Greater Comfort and Security UV Protection Increased Home Value How to Remove Windows Properly 1. Inspect Your Windows 2. Remove the Sash Weights and Stops 3. Remove Paint 4. Repair Any Cracks 5. Prepare the Surface 6. Install Flashing Tape 7. Install the Window […]