Is your roof damaged from a recent storm? Is it approaching the end of its lifespan? Do you have more and more areas of your roof to repair? Do you have water leaking into your home? It is probably time for a new roof.
A roof replacement is an expensive undertaking. When it is time to replace your roof, the first step is to tear off the old roof. If you are a homeowner looking to save money on your roof replacement costs, you can do the tear off yourself. It does not take specialized skills to remove a roof, but it can be hazardous and strenuous work.
Before you begin the work, consult with a professional roofing contractor. Ask how much you can save so you can decide if the cost savings is worth the work.
Cost of Removing Roof Shingles
The cost of a new roof can vary widely. Pricing depends on your location, the square footage of the roof, the roofing materials, the style of roof, the roof complexity and pitch, the condition of the sub-roof, and the demand for roofing services in your area at any given time. Typically, the price of a new roof has the cost of the removal and the cost of the installation bundled together. But if you are willing to do the tear-off work yourself, you can cut that final cost.
Consult with your roofing contractor to find out what discount you’ll receive from removing your roof yourself. When broken out, you can expect around $150 for the removal of each roof square, a 10 x 10 section of roof. If your roof has several layers from previous roof overlays, the cost will increase, as will the work required to remove all the shingles from the roof.
For an average size roof, you can expect to save at least $1,000 on the cost of a roof replacement with a DIY roof removal. Depending on the size of your roof, this savings could increase to several thousands of dollars. The larger the roof, the larger the savings, but this also means a lot more work for you.
Hazards of Roof Shingle Removal
Removing the roofing shingles from a home’s roof is a big job, but it can be accomplished if you have the right tools and can handle the hard work. However, if you are unsure whether you can handle the work, or you have any health conditions that could make working on a roof unsafe, you may not want to do the work yourself.
Some roofs are particularly hazardous due to their pitch. Very steep roofs need specialized equipment that is not easily managed by the average homeowner. In these cases, you’ll want to hire a roofing professional to remove your roof instead of attempting it yourself.
How to Dispose of Roof Shingles Properly
There are two parts to the work of removing roof shingles. First, you have to remove the shingles themselves. Then, you have to deal with roof shingle disposal. This guide will detail how to remove roofing shingles easily and safely and how to contain and dispose of the waste and debris that comes from a roof tear-off.
The best way to dispose of asphalt roofing shingles is to use a dumpster container. You can get a rental roll off dumpster delivered to your home’s driveway. This makes it easy to toss the shingle roofing waste into the dumpster container from the roof. Any shingles that fall off the roof around your home can be loaded into a wheelbarrow and pushed to your rental dumpster.
A large dumpster container will have a swinging back door that allows you to walk into the dumpster and dump the shingles into the dumpster easily. This allows for more even weight distribution and lets you use the dumpster space as efficiently as possible.
Roof Shingle Weight
Asphalt shingles are heavy. Most bundles of shingles weigh about 45 to 60 pounds per bundle. Roofing shingles are measured in what is called a “roof square.”
This is the amount of shingles needed to cover 100 square feet of roof. For example, a 2,000 square foot roof is a “20 square.”
In most cases, you’ll need about 3 bundles of shingles to replace one square of roof. Thus, on average, a square of roof holds about 150 pounds of shingles.
Because of the weight of asphalt roof shingles, it is important to properly handle disposal. You’ll have more shingles to discard than can be placed in your residential trash, and in fact, most trash haulers won’t accept large quantities of asphalt shingles.
The weight of asphalt shingles must be taken into consideration when arranging for a dumpster. Most municipalities, counties, and states have regulations governing the amount of weight that can be hauled on streets and highways. Landfills also impose limitations on the weight of dumped loads. While you may be able to get a large dumpster to contain all your shingle waste, it could result in a container that is over the weight limit.
Recycling Roof Shingles
Alternatively, you may be able to recycle your used asphalt shingles instead of disposing of them in a dumpster. With 12 million tons of asphalt shingles ending up in U.S. landfills each year, shingle recycling centers are becoming increasingly important. Asphalt shingles may be recycled in some areas. This prevents the shingle waste from going into your local landfill and reduces the use of raw virgin materials in the manufacture of asphalt products.
Recycled shingles can be used in asphalt paving projects such as roads and parking lots. A National Asphalt Pavement Association (NAPA) Asphalt Pavement Industry Survey published in 2020 shows that $59 million are saved each year in road construction costs over the use of virgin road materials. There is also a valuable reduction in landfill waste when used asphalt roof shingles are diverted from landfills to reclaimed use.
Still, most asphalt shingles end up in landfills. Homeowners typically find it challenging to locate a collection facility that will take used asphalt shingles. There is also the problem of transporting the shingles to the facility.
The reality is that the most efficient method of disposing of asphalt shingles is to use a dumpster and have them transported to a landfill. Until recycling technology advances, this will remain the easiest and most cost-effective way to dispose of shingles while working on your roofing project.
What are Asphalt Shingles?
Asphalt roof shingles are the most affordable and popular roofing material in the United States. These shingles are made in layers of cooled hot mix asphalt, and are known to last up to 20 years.
Asphalt shingles are composed of a base mat covered in a waterproof layer of asphalt. The base mat is made of either fiberglass or cellulose fibers. They are then topped with ceramic granules. These layers keep water from leaking into your home and protect the roof from UV rays.
Asphalt shingles are durable, easy to install, and affordable. In fact, they are the most affordable option for roofs, coming in at less than a quarter the cost of clay tile, slate, wood, and metal roofs. Because of this, asphalt shingles are chosen by more homeowners and roofing contractors than any other roofing material.
Benefits of Asphalt Shingles
Asphalt shingles offer many benefits over slate, cedar shakes, metal, and other roofing choices. They offer excellent protection against the elements. Roofing installers like asphalt shingles for their ease of installation and repair. These shingles can even make your home quieter, as they work well at reduce sound transfer.
Asphalt roofing shingles work well in all types of climates, including desert and tropical regions. They stand up well to extreme cold temperatures, rain, snow, and ice. Although asphalt shingles can be used in high-temperature environments, you should choose light color shingles over darker colored ones. Dark shingles absorb the heat from the sun and can heat up to 60 degrees above the ambient temperature.
Asphalt Shingle Design
Asphalt shingles come in two models, a 3-tab version or what is termed architectural singles. The 3-tab shingles look like three shingles, but are actually one single flat unit with three separate tabs on the lower edge. These shingles fit together like a puzzle during installation.
Architectural shingles are composed of two asphalt shingles strips that are laminated together. This forms a shingle that has a dimensional aspect to it, mimicking the look of a wood shake roof. Architectural shingles have a longer life span, but are most often chosen due to the look and curb appeal they offer. For these reasons, architectural shingles can cost up to three times as much as typical 3-tab asphalt roofing shingles.
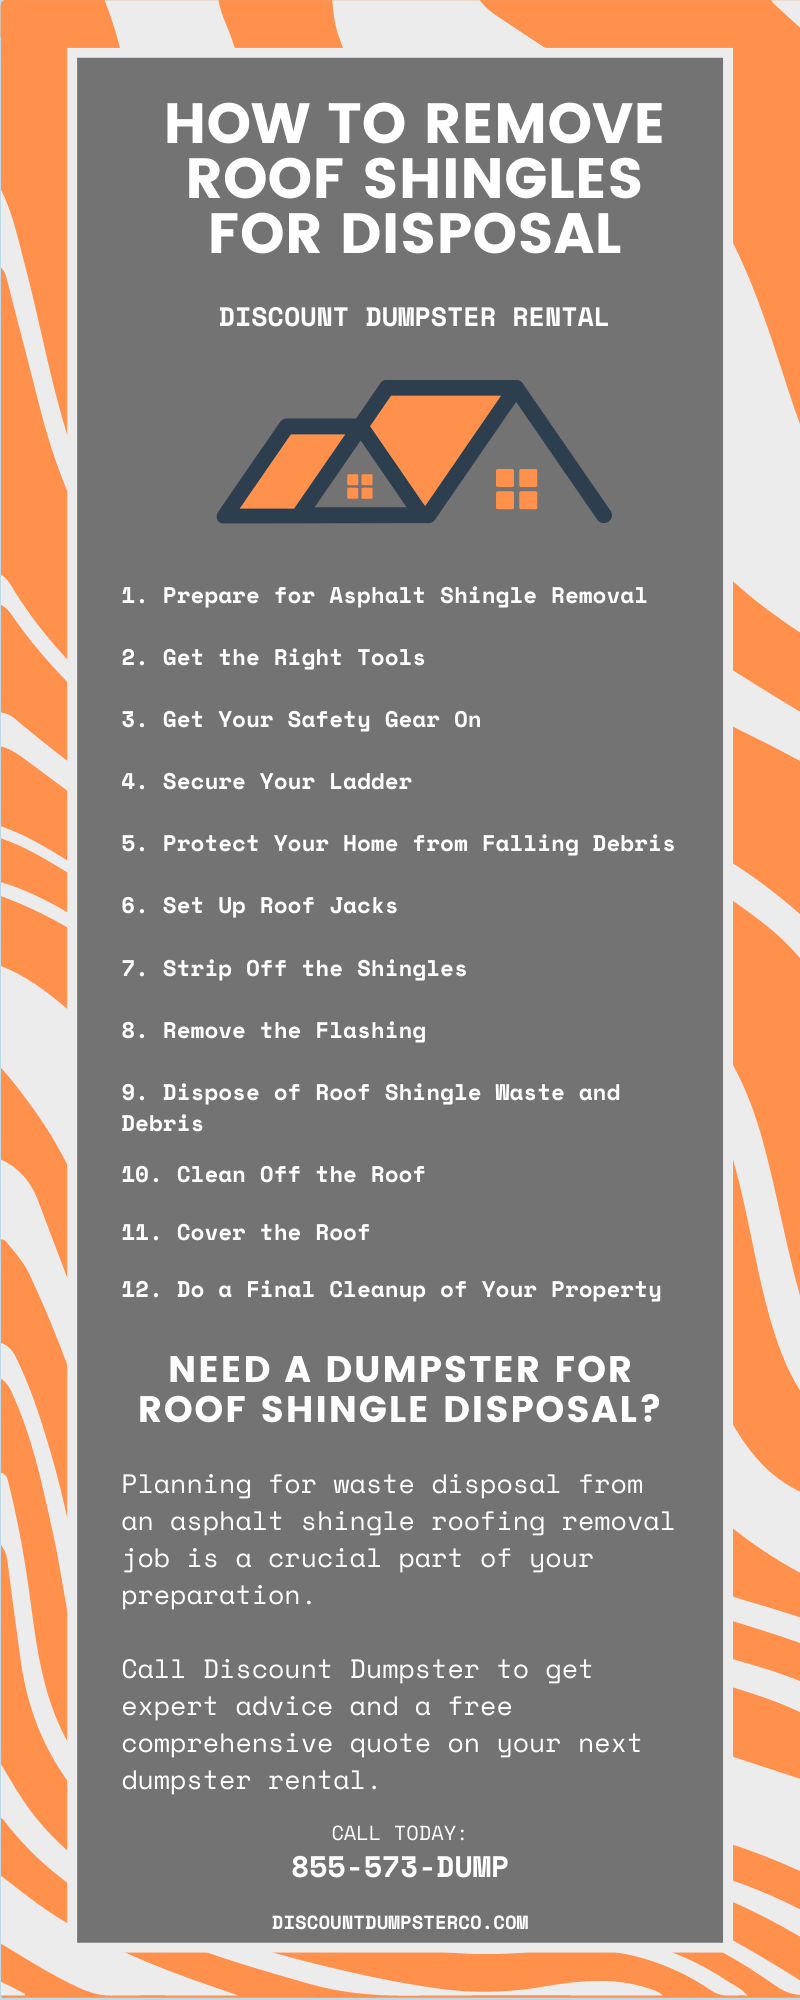
Asphalt Shingle Removal in Quick Steps
Removing asphalt roof shingles does not require the same skill level as installation. A homeowner can manage this as a DIY project with the understanding that while the job is not complicated, it is hard work. There are also some hazards to be aware of. Working on a sloped roof can lead to a fall causing serious injury or death.
These steps will walk you through how to dispose of roof shingles from preparation to safety concerns to tear-off to disposal. Since roofing work can be hazardous, it is important not to skip steps or take shortcuts. Roofing work should never be done alone or in inclement weather. Have the right tools for the job and get some help when working on your roof.
Before you start tearing off your asphalt shingle roof, you should plan your start date and work flow. Once your shingles are off, you need to get the roof replacement up as soon as possible.
Check the weather to ensure you will have a few dry days to do the work. In most cases, a roof cannot be installed in active rainy weather. Water on a roof is slippery and can lead to a dangerous fall. Roof tear-off work should only be done in calm weather.
Prior to beginning work, check with your city or county engineering department to determine if you need a permit for asphalt shingle removal. If a permit is needed, you will need that in place with all fees paid before you begin work. Your homeowners’ association may also have restrictions on this type of work.
Timing is important when doing roofing work. If you are not doing the re-roofing yourself, consult with your roofing contractor. They should be lined up and ready to get to work as soon as your roof is completely pulled off and the shingles are disposed of. If you are counting on help from friends or family, double check with them before starting work.
2. Get the Right Tools for Easy and Safe Asphalt Shingle Removal
Gather all your tools and safety equipment before you start. A key part of your safety strategy should be to use the correct tools for the job. This will not only make it safer for you, it will also get the job done more easily and quickly.
These are the tools you’ll need to remove your asphalt shingle roof:
· Pry bar
· Roofing shovel or large garden fork
· Hammer
· Cat’s paw tool
· Broom magnet
· Adjustable roof jacks
· Rental dumpster
You will need a way to dispose of your roofing shingles. Typically, the debris from a home’s roof will exceed the amount you can place in your residential trash. Line up a dumpster rental before you start work. You’ll want it in place in your driveway before you begin work.
Again, check the weather and have everything in place for both your roof removal and reroofing. Coordinate the delivery of your rental dumpster with the day you want to start working, so you don’t have a delay at the beginning of your project.
3. Get Your Safety Gear On
You and your helper crew need safety gear to work on your roof. Put this equipment on every time you step onto your roof surface. You risk serious injury if you don’t use this safety equipment properly.
· Work gloves
· Thick-soled boots
· Long sleeved shirt
· Long pants
· Eye protection
· Roof harness
You need the proper gear to prevent injury from falls or slips and to protect yourself from the elements. Working on a roof is hazardous. A harness, good shoes, and a sturdy ladder can help prevent falls and slips.
Falls are the leading cause of death in the roofing industry. Even lower roof lines can be dangerous.
Over half of roofing fall accidents involve falls of less than 15 feet. Take good care when getting up and down from your roof and when working on the roof surface.
You also have to contend with the weather. A good rule of thumb is to not climb onto your roof at all if there is rain, wind, or lightning in the area. But even a clear day can be hazardous.
Heat exhaustion and heat stroke can come on rapidly when you are working on a hot sunny day. To prevent this hazard, wear the right clothing, hydrate frequently, work during the cooler times of day, and take lots of breaks.
4. Secure Your Ladder
Injuries are most common when using a ladder to get on and off a roof. To be safe, use a sturdy extension ladder. The ladder should extend about 3 feet above the roof edge. Your ladder should be placed on ground that is level and firm.
For further stability, the top of the ladder can be secured to the roof with a rope. Fasten one end of the rope to a rung near the top of the ladder. Tie the other end of the rope to a nail driven into a rafter in the roof. This prevents the ladder from slipping to the side when you step onto the roof.
Don’t carry your tools and other materials up the ladder. Instead, use a bucket system to hoist what you need up onto the roof. Load a bucket with your tools.
Attach a rope to the bucket and pull it up once you are on the roof. This process is easier with a helper to assist with the loading of the bucket.
5. Protect Your Home from Falling Debris
To protect your home, cover any windows close to your rental dumpster with heavy cardboard or plywood. This will protect them from any stray shingles that get kicked out of the dumpster. If you have shrubs or flowerbeds under your roof line, especially where your dumpster is located, cover them with tarps to protect them. Remove your barbecue grill, backyard toys, patio furniture, and your cars from the area along your roof line to prevent any damage to them from falling shingles.
6. Set Up Roof Jacks
Roof jacks attach to your roof and hold boards that provide you with a foot hold on the roof’s surface. They should be placed at least every four feet in the area you’re working in. For maximum hold, attach them to the roof with roofing nails placed through the roof’s surface and into the rafters. Top them with plywood to provide a stop for shingles and a foot hold for you and your crew.
7. Strip Off the Shingles
Start removing the asphalt shingles from the highest peak of your roof. Work on removing the roof cap first. Shove your large fork or roofing shovel under a layer of shingles and lift to pry them loose.
Once they come free, you can push them down the roof toward the roof jacks. Once the cap is removed, it is straightforward to pull off the rows of shingles. Work in about three feet sections at a time.
While the shingles will come loose this way, this is still hard work. Asphalt shingles are very heavy. Only work on one section at a time, removing the section of shingles and then moving to deposit that batch in the dumpster. Once they are cleared, you can begin a new section.
8. Remove the Flashing
Flashing may be reused if it is in good shape. However, if it shows sign of wear, has cracks or rust, or is missing sections, you will want to clear it off your roof in preparation for new flashing installation.
Old shingles underneath the flashing need to be removed. Pry up the nails holding it in place and gently pull it up and out of the way. Remove the shingles and then tap the flashing you wish to reuse back in place.
If the flashing cannot be reused, you can pull it out completely. Remove the nails holding down the flashing. The flashing can then be pulled away, along with any shingles underneath it. Take care not to damage the roof surface when removing flashing.
9. Dispose of Roof Shingle Waste and Debris
As you remove each section and push it toward the roof jacks, you will accumulate a pile of old shingles and removed flashing. These need to be transported to the dumpster.
Work in small batches so you maintain your balance as you walk to the roof edge above the dumpster. Once you’ve cleared a roof section, move the roof jacks to another part of the roof. Attach them securely and begin work on that section.
You can also place a tarp under the area you are working on to collect the shingle waste. Toss the old shingles onto the tarp and then gather it up for transport and disposal into your dumpster container. This is a helpful technique when you are working on the side opposite the dumpster in your driveway.
10. Clean Off the Roof
When all shingles have been removed, do a last walk over of your roof surface, looking for any stray shingle portions you may have missed. When you pull off asphalt shingles, there will invariably be nails left behind in the roof surface. All of these have to be removed.
Use your hammer or nail puller to get them all out. Sweep the surface of the roof to get up any remaining debris or dirt.
With a cleared roof, do a good inspection of the structure and the sheathing. Identify any portion that is damaged, rotting, or missing. These sections should be repaired by your roofing contractor before installing new shingles.
11. Cover the Roof
Even if you have a roofing contractor lined up, place some protection on your roof. Storms can roll in unexpectedly. Rainfall will leak into an uncovered roof, causing damage to the inside of your home.
If rainfall is expected, temporarily cover the roof with overlapping tarps. Lay the tarps so that the water is diverted from the top of the roof to the bottom. Place weights on the corners and edges of the tarps to keep them from blowing away.
12. Do a Final Cleanup of Your Property
Roofing cleanup is, of course, very important. Your gutters are a perfect trap for bits of shingles or loose nails. Clear them out, making sure that no debris enters your downspouts. Pick up any stray shingles from your lawn, landscaping, and patio and deposit them in your dumpster.
Nails can be difficult to find in landscaping or grass. These stray nails can be hazardous, especially to pets and children. Rent a magnetic nail wand and walk it over your property. It will pick up most loose nails.
If you can’t find one to rent, ask your roofing contractor to do this before they start the roof installation.
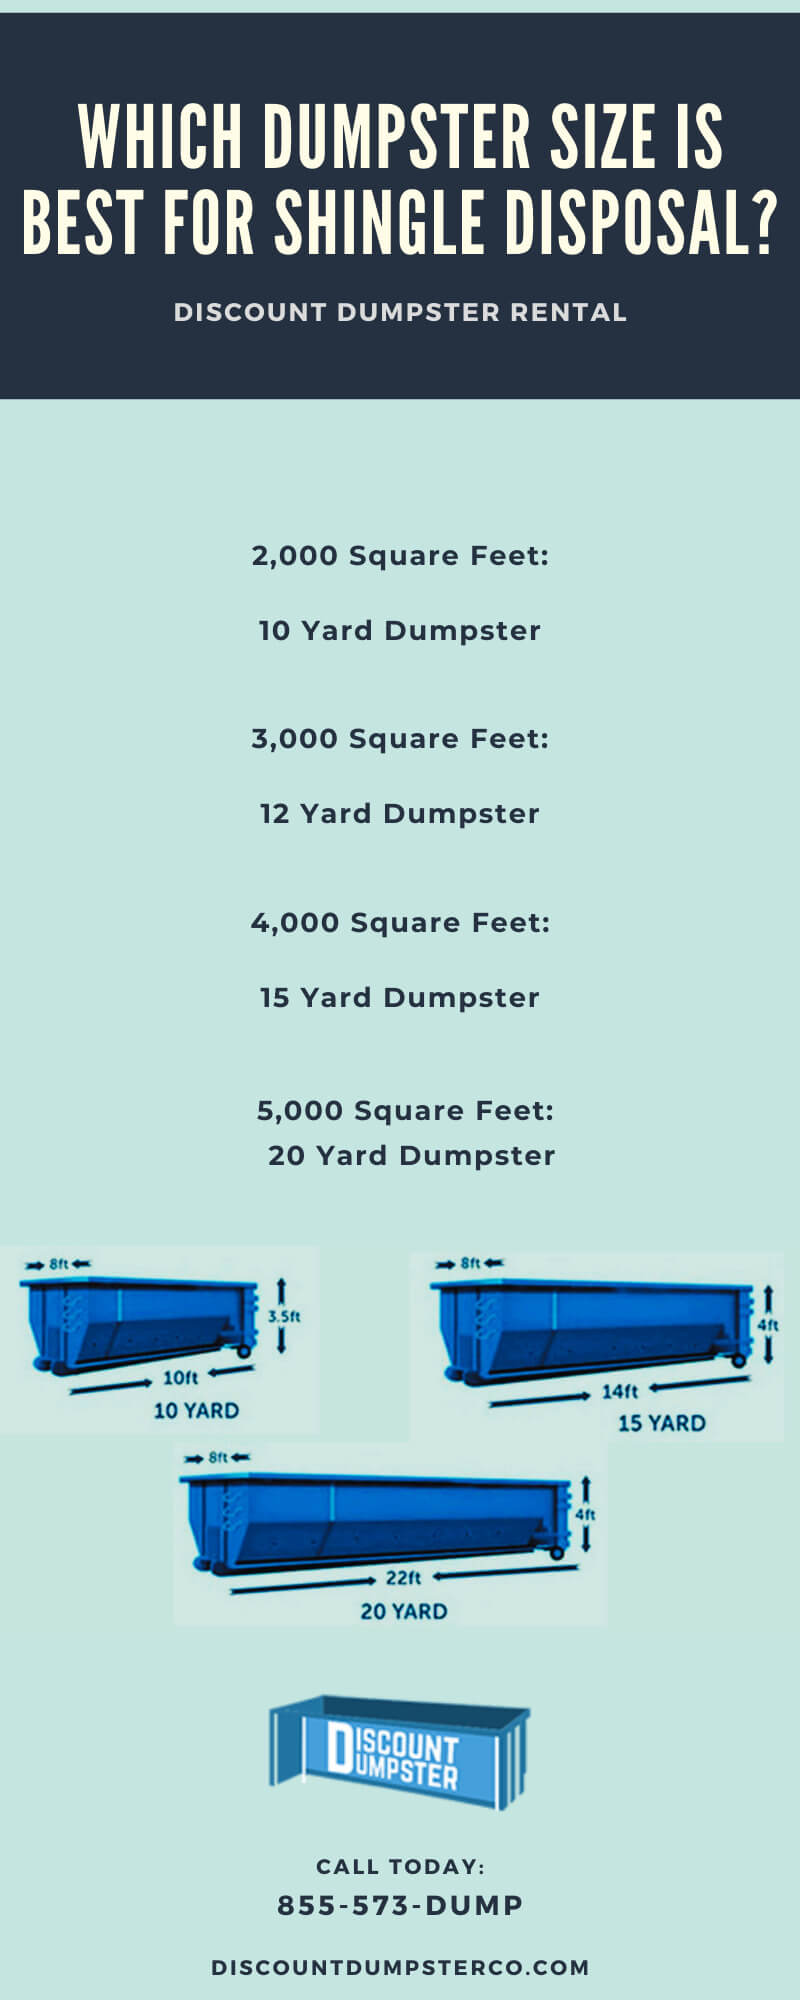
Which Dumpster Size is Best for Shingle Disposal?
Tearing off an asphalt shingle roof is a big job that will generate a lot of heavy waste and debris. It is essential that you have a rental roll off dumpster handy. Most dumpster rental customers choose a 20-yard dumpster for a typical residential roof removal project.
If your roof is smaller, you may not need a dumpster that large. For smaller roof removal projects, we offer 10 and 15 yard dumpster containers.
Asphalt shingles weigh about 2 to 4 pounds per square foot. You may also have wood underlayment and deck, flashing, and gutters to remove. These all add to the weight of the roofing waste load.
For this reason, we do not typically recommend a dumpster container over 20 cubic yards in size. Anything larger will almost certainly exceed any road or landfill weight limits.
We are happy to help you determine the right size dumpster for your roof removal project. Use this guide to determine the best size dumpster container to rent:
Approximate Roof Size Dumpster Size
2,000 square feet 10-yard dumpster
3,000 square feet 12-yard dumpster
4,000 square feet 15-yard dumpster
5,000 square feet 20-yard dumpster
If you have a very large roof, you’ll likely want to get the biggest size you possibly can, but not all size dumpsters are suitable due to the weight of the shingles. Anything over a 20-yard dumpster size can exceed most landfill or roadway weight limits. We are unable to transport your rental dumpster to the landfill in these cases. If you have a particularly large project, it is better to use a couple of smaller containers rather than one massive roll off.
When you call to order your rental dumpster container, we can help you choose the correct size for your project. You don’t want a dumpster that is too small and can’t contain all the shingle debris, but you also don’t want to overpay for a dumpster that is too large for your job. Our team has years of experience working on roofing jobs. We’ll talk over your project, get some measurements from you, and figure out the proper size dumpster for your need.
Need a Dumpster for Roof Shingle Disposal?
Planning for waste disposal from an asphalt shingle roofing removal job is a crucial part of your preparation. Call Discount Dumpster to get expert advice and a free comprehensive quote on your next dumpster rental.
Table of Contents What Goes into Removing Concrete? What is the Cost to Remove Concrete? 1. Concrete Thickness and Volume 2. Reinforcement Removal 3. Location and Accessibility 4. Equipment Rental Costs 5. Disposal Fees 6. Labor Costs 7. Permit Fees Plan Well to Make Your Concrete Removal Easier Homeowners can save money on home improvement […]
Table of Contents Can Propane Tanks be Thrown Away? How to Dispose of Propane Tanks 1. Wear Proper Safety Gear 2. Turn Off all the Devices Connected to Your Tank 3. Don't Put Your Propane Tank in the Trash 4. Bring Your Tank to a Retailer Propane is Safe to Use and Easy to Dispose […]