Demolition is the most exciting and speedy part of the remodeling process. Getting to work on demo projects around your home can be a satisfying, labor intensive activity. But before you go swinging a hammer, plan out your demo project. Gathering the proper tools will save you headaches. You should also understand the safety protocols you’ll need to follow. Josh Snyder, owner of Sawdust Custom Home Creations says,
“In real life, demo day takes a few days, is really loud and noisy, and everything is covered in dust.”
Doing demo work yourself can save you a lot of money and relive stress. It's an essential part of transforming your house into the home of your dreams. These tips can help you complete your demo projects quickly, easily, and safely.
Demoing a Bathroom
Remodeling a bathroom is often one of the first remodeling projects new homeowners undertake. Its smaller size lets you try out your demo and remodeling skills before tackling a larger project. You can save about $500 to $800 by doing the demo work yourself.
You must take care to complete the project safely. Since there are electrical wires and plumbing in the walls, make sure you feel comfortable before starting any demo.
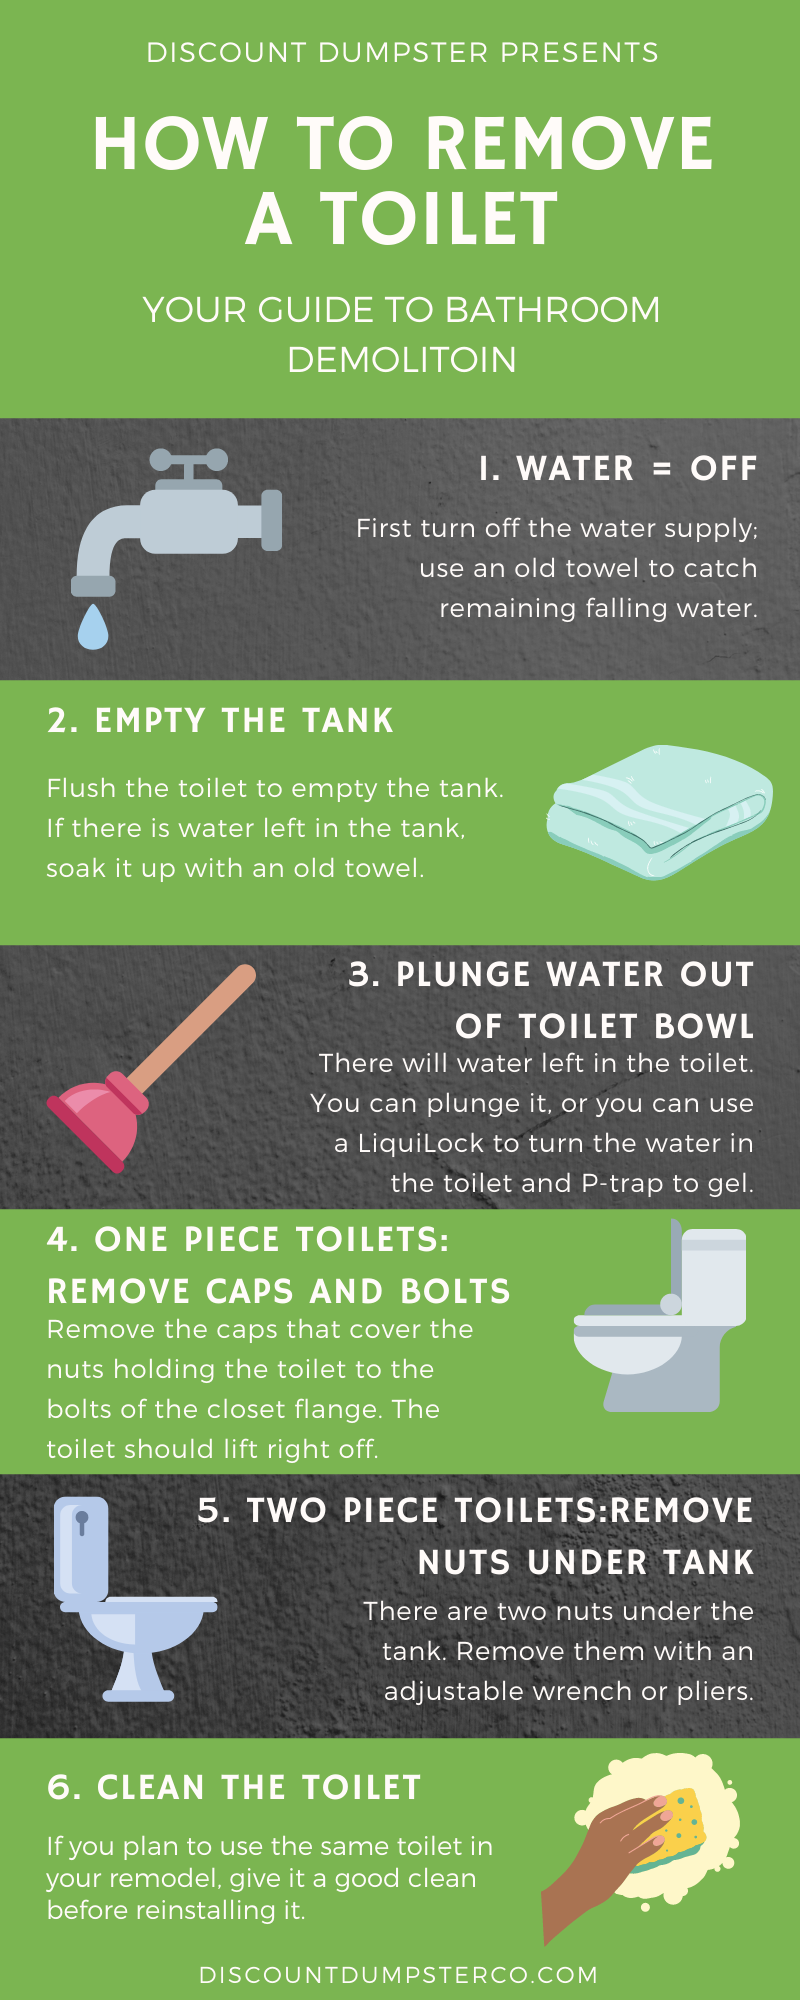
Step 1: Remove the toilet
Close off the water supply to your toilet. Flush the toilet several times to get rid of as much water as possible. Then, remove the tank from the back. Disconnect the water supply, unscrew the bottom bolts, and lift the toilet up and out. Plug up the floor hole with rags to prevent leakage of sewage gas.
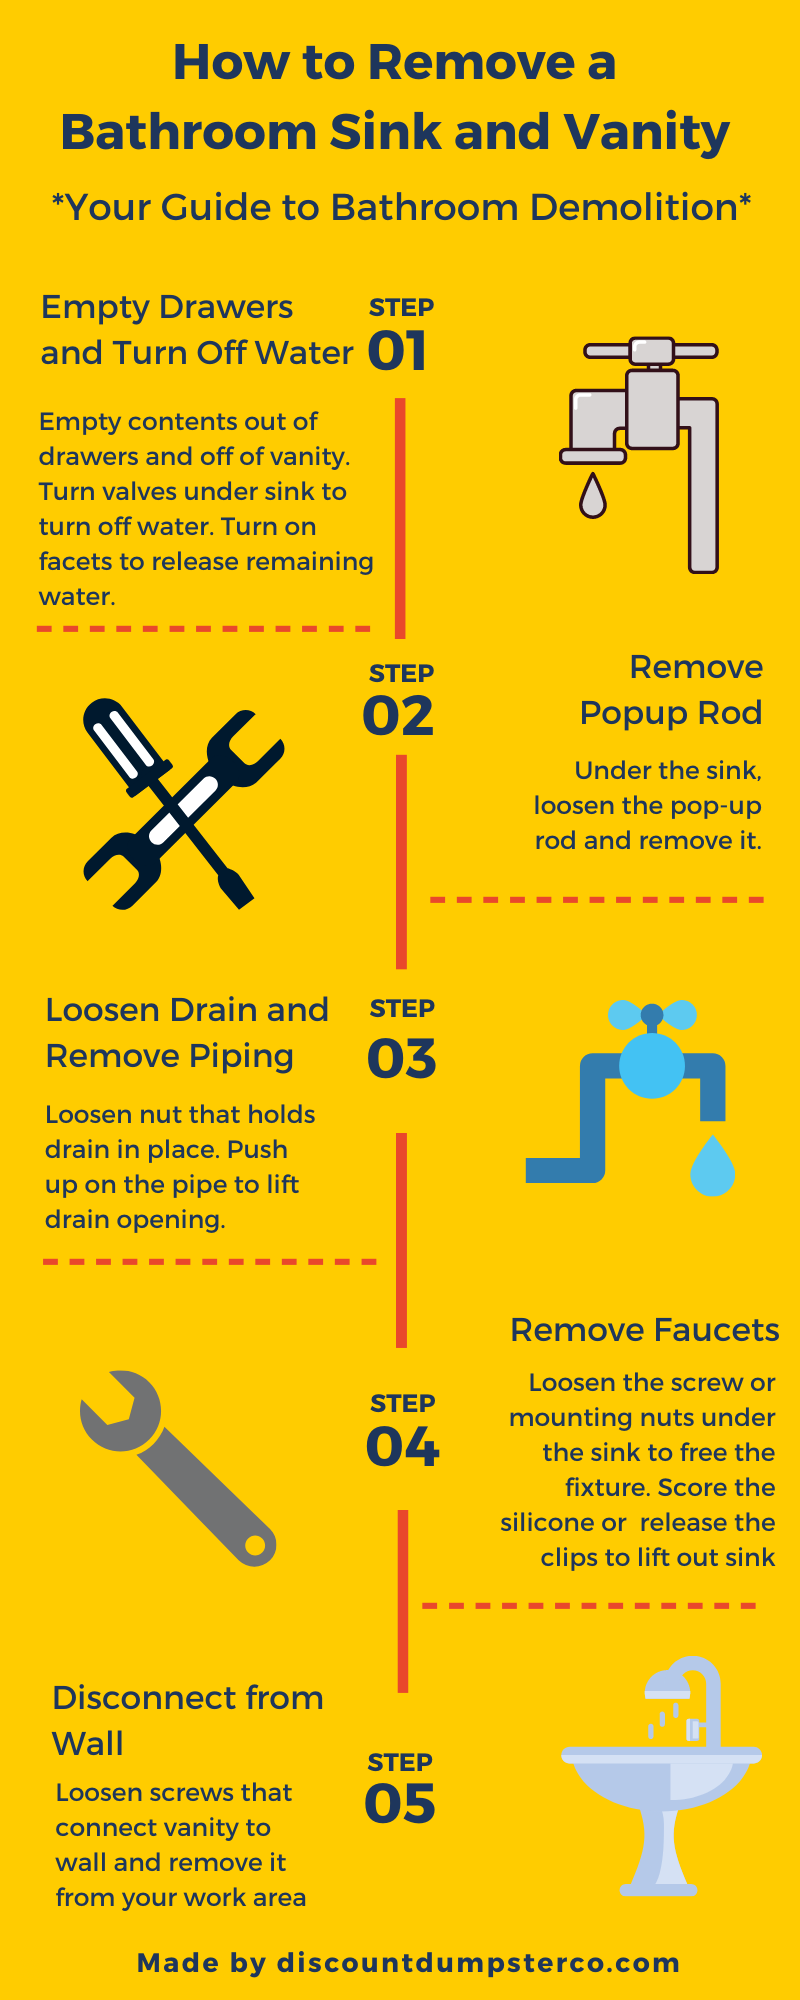
Close off the water valves to the sink. Disconnect the water lines and remove the screws holding the sink to the vanity. Cut through any caulking surrounding the sink. Then, lift the sink up and out. Unscrew the vanity cabinet from the wall and remove. Remove the mirror or medicine cabinet and all light fixtures from the room.
Break up and chisel out ceramic tile. To remove tile in a shower, first remove any caulking. Using a hammer, break up the tile and pry it up using a chisel or pry bar.
Cut the water supply to the bathtub. Remove the faucet and the bathtub drain. Also remove any caulking around the tub. Once the hardware has been removed, you can rock the tub loose and remove it from the room.
Step 5: Clean up the space
Demoing a bathroom creates a lot of debris. Remove the waste as you work, but also give the space a good final cleaning. Vacuum up all the dust and collect any loose nails or screws.
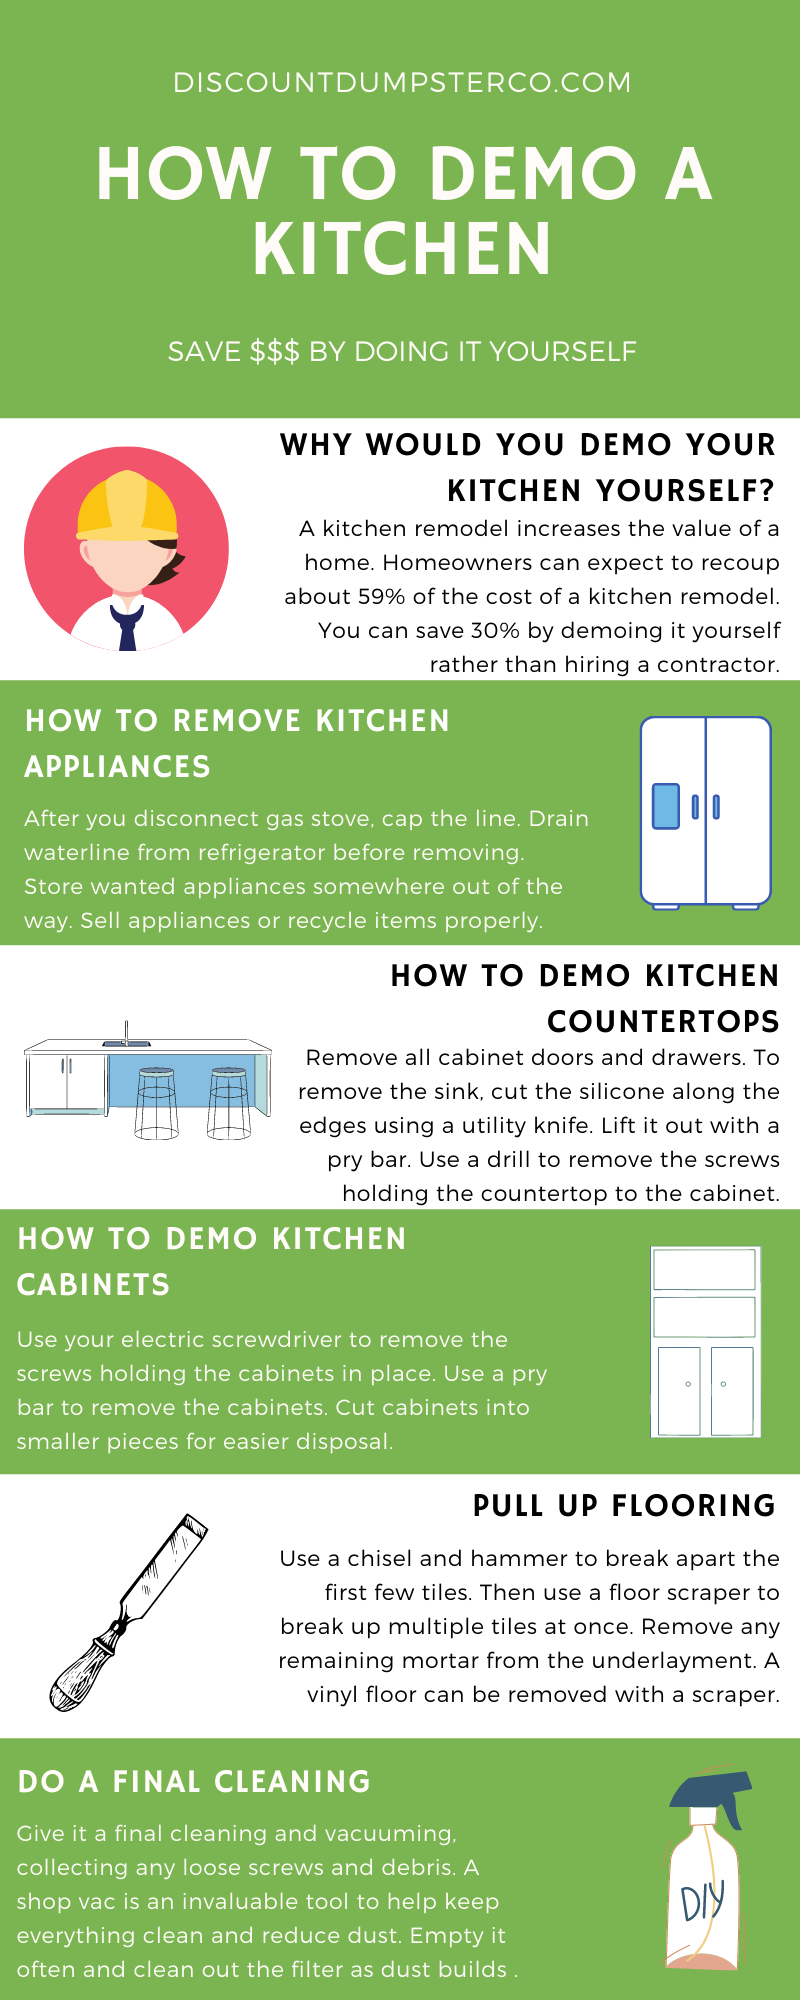
Clear out the cabinets and remove the food from the fridge. Cap the gas line to the stove after disconnecting it. Drain out the water from the refrigerator with an ice maker. Use a dolly to remove the appliances from your kitchen.
Step 2: Demo the kitchen countertops
Remove all cabinet drawers and doors. Cut the silicone around the sink with a utility knife. Unscrew the sink and lift it out of the countertop with a pry bar. Remove the screws attaching the countertop to the cabinets. Pry the countertops off the cabinets and remove.
Step 3: Demo the kitchen cabinets
Unscrew the cabinets from the wall and from each other using an electric screwdriver. Use a pry bar to pull the cabinets away from the wall. You can cut the cabinets into smaller pieces for easier removal.
Vinyl flooring can be removed using a scraper. If it is firmly glued down, use a heat gun to loosen the glue for easier removal. A tile floor will need to be broken up and scraped from the sub-floor, using a chisel and hammer or a large scraper.
Step 5: Do a final cleaning
Use a shop vac to get up debris and any loose nails or screws.
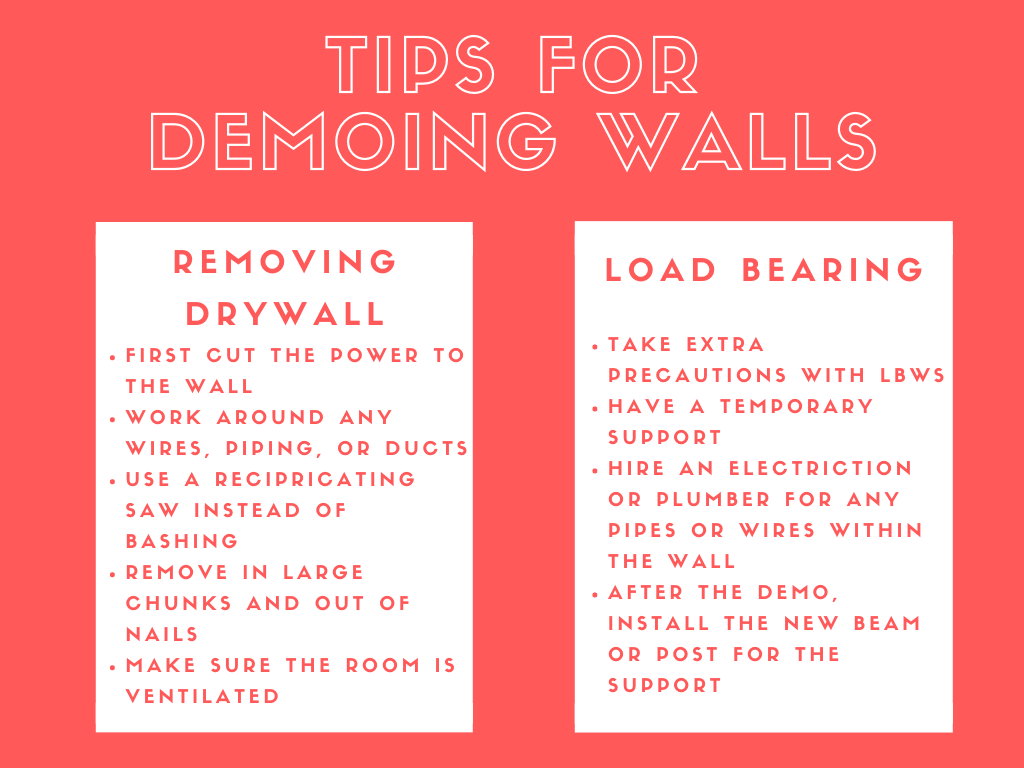
Removing a wall in your home opens up the living space, giving it a welcoming and light feel and improving traffic flow. Creating more open space in your home can also increase the resale value of your home. Before you demo a wall, you’ll need to determine if it is load bearing or not. Removing a non-load bearing wall is pretty straightforward, but you’ll need to take extra precautions with a load bearing wall.
A load bearing wall is a wall in the exterior or interior of your home that transfers the weight of your upper floor or roof down to your foundation. A wall is load bearing if it has a large beam or spliced ceiling joists that meet together atop it. It will typically have angled struts supporting the roof or joists running perpendicular above it. All outer walls are load bearing as well.
If you are going to remove a load bearing wall, you must replace the support it provides. This new support is typically a beam or a beam and post. Before starting the demo, you will need to provide temporary support until you get the replacement beam or post in place. If there are water, gas, or electrical lines in the wall, you may need the assistance of a plumber or electrician to move those lines. After the wall has been demoed, set in place the supporting beam.
Safety comes first when removing drywall. Before starting to demo drywall, it is important that you cut the power to the wall. Then, determine if there is any wiring, piping, or ducts in the wall and plan on working around it.
It can seem satisfying to grab a hammer and begin smashing through drywall to demo it. But this results in a big mess and can be very labor intensive. Alexa Erickson, writing for home remodeling guru Bob Vila, explains,
“While it may feel oddly pleasing to take a sledgehammer to a wall, the process can be wasteful.”
Instead, she recommends,
“Choose deconstruction over demolition.”
To accomplish this, use a reciprocating saw. You can easily cut large pieces of drywall and remove them as you go. Once you’ve got the demo going, you can use your hands to pull off large pieces. Drywall shouldn’t be saved for later use; you can break it as you remove it. Start at the top of the wall and work down. Remove the drywall in large pieces, prying it free from screws as you go. Remember to have good ventilation in the room and a large lined trash container. You’ll have to remove all the nails or screws from all the studs as well.
Demoing Flooring
Whether you are renovating your whole home or just doing a smaller room update job, removing the flooring is probably on your list of things to do. Removing flooring is a simple process, but it does take some work. Having the proper tools and understanding the process will help you complete the task without extra effort.
Hardwood Flooring Removal
Removing a hardwood floor is a simple process. It is quick if you are not intending to keep any of the wood boards. In that case, cutting the flooring into smaller pieces is the best way to go. If your hardwood is in good condition, you can consider keeping or donating it, but you would have to more carefully remove the wood boards.
Cut through any paint or caulk along the edge of the baseboards. The easiest way to remove baseboards is with a trim puller and a hammer. Use the hammer to tap the trim puller behind the baseboard and then pry the baseboard from the wall.
Step 2: Cut into smaller sections
Rather than trying to pull up long boards, cut them first to make removal easier. Use a circular saw to cut the boards perpendicular to the direction of the wood. Adjust your saw blade so it doesn’t cut into the sub-flooring. The wood boards should be cut into one foot pieces for easiest removal.
Step 3: Pull up the boards
Use a pry bar and mallet to pull up each cut board section. Shove the pry bar underneath a floor board and pull back on the bar. If you encounter a stuck board, use a chisel to tap under it and loosen it up before prying it off the floor.
Step 4: Clean up your mess
You’ll find plenty of nails and staples. These can be removed using a nail claw and vice grips. Discard the staples and nails as you go. To make sure you got them all, run a large magnet over the sub-flooring to catch any strays. Finally, use a shop vac to get up all the dust and splinters on the floor.
Vinyl Flooring Removal
If vinyl flooring is in good condition, it can be resurfaced with laminate, carpet, other vinyl, or even some types of hardwood. But damaged vinyl flooring should be removed to make room for a new floor. Vinyl flooring is easy to remove with the right tools.
Tools needed:
Trim puller
Hammer
Pry bar
5-in-1 tool
Utility knife
Heat gun
Step 1: Remove the baseboards
Just as with hardwood floors, the easiest way to remove baseboards is with a hammer and trim puller. First, cut through any paint or caulk along the edge of the baseboards. Then, insert the trim puller in the space between the baseboard and the wall. Gently pull the baseboard away from the wall.
Step 2: Start in the center
Full sheet vinyl flooring can be installed by only gluing the perimeter edges. If this is the case for your floor, then removing it is much easier. Cut into the center of the vinyl using a utility knife. If the vinyl comes up easily, then it has not been glued in the center.
Step 3: Cut flooring into pieces
Whether your vinyl is fully glued or not, you will need to cut the vinyl into strips to remove. Narrow strips about 6 to 10 inches are easier to work with and dispose of. After pulling back a section of flooring, cut it into smaller pieces for easy removal.
Step 4: Get under the glue
Use your pry bar and a 5-in-1 tool to scrape under glued portions of your vinyl flooring. If the flooring is stuck or difficult to remove, use a heat gun to loosen the glue. Use low heat and move the heat gun back and forth over the glued section. You should be able to then pull the vinyl up more easily.
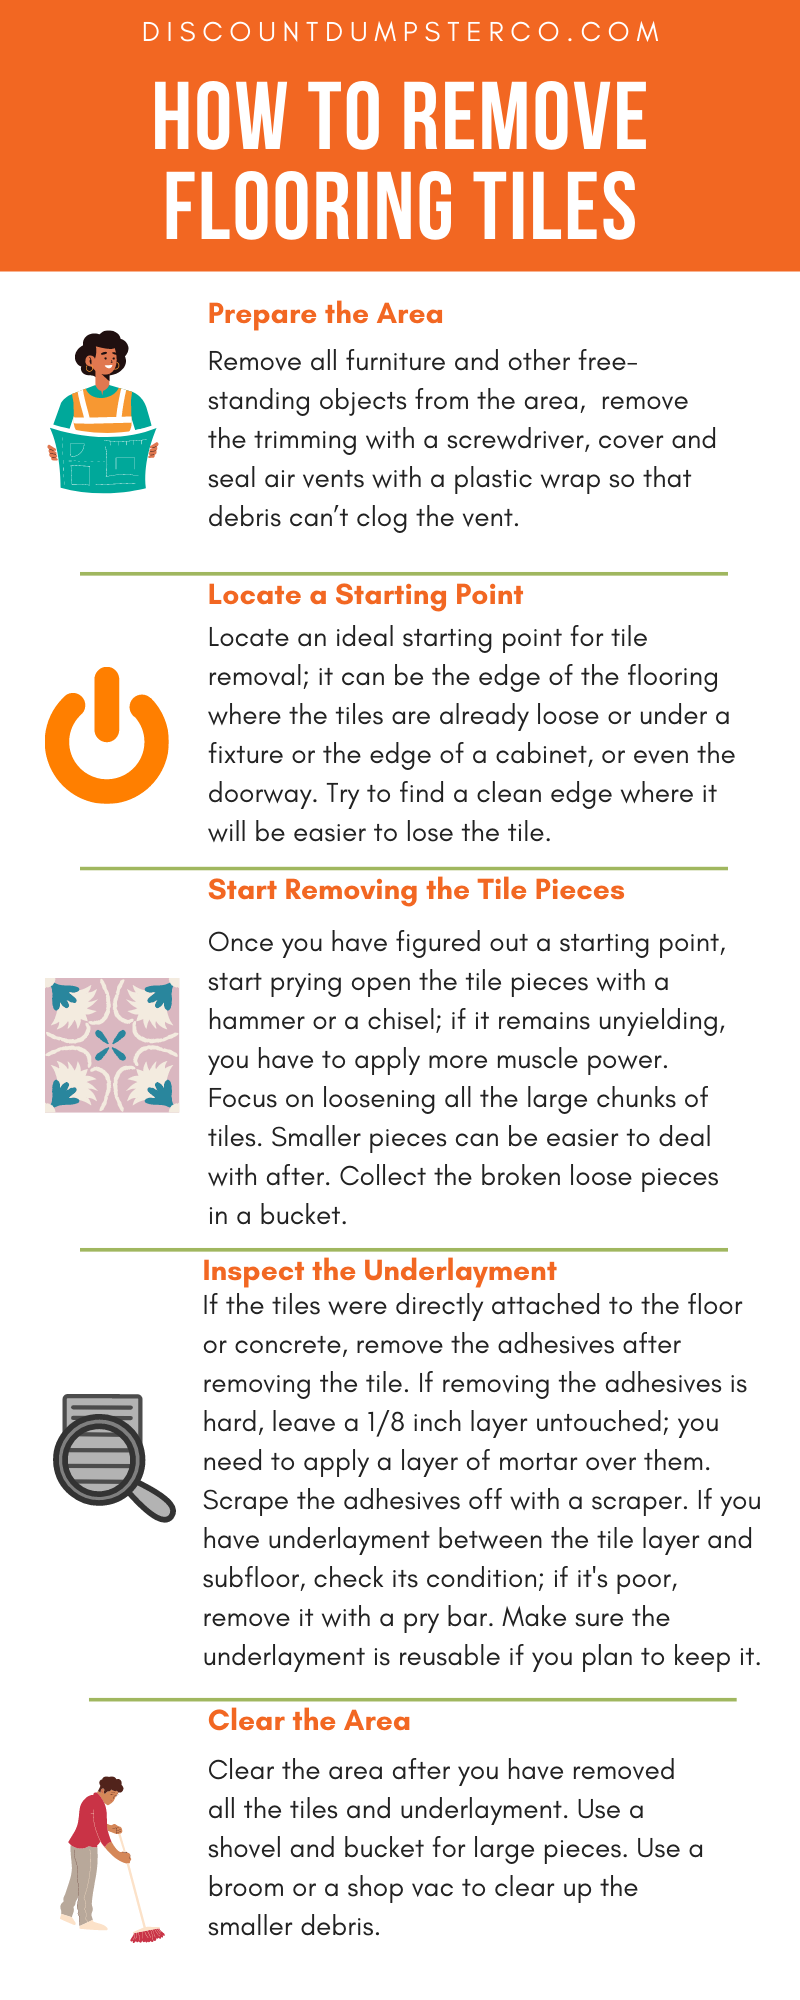
Removing ceramic tile flooring is a straightforward process, but it does require some time and elbow grease. Removing the tiles completely allows you to inspect your sub-flooring. This is especially important in rooms that tend toward mold problems, such as a bathroom.
Tools needed:
Trim puller
Hammer
Chisel
Floor scraper
Shop vac
Step 1: Remove the baseboards
Just as with other types of floor removal, taking off the trim and baseboards is your first step. Using a trim puller and a hammer, carefully remove the baseboard trim. If you are careful, you may be able to reuse this trim after your floor is replaced.
Step 2: Begin to break up the tile
Choose a tile near the center of the room. Using your hammer, break the tile. Use a chisel to pop up a section of the tile. You can then place the chisel against the adjacent tile and begin to pry that up.
Step 3: Continue with tile removal
Continue to break up tiles and loosen them using your chisel. If you are finding it difficult to loosen up the tiles, you may need to scrape out some of the grout surrounding the tiles first. Once a section of flooring begins to open up, you can then use the floor scraper. Slide it under adjacent tiles to remove a larger area of tile at once.
Step 4: Remove underlayment and old mortar
Use your floor scraper to pull up any remaining old mortar. Inspect your underlayment and sub-floor. If any of it is damaged, you’ll need to replace it. Use your shop vac to collect any remaining dust and debris.
Removing old carpeting can have a big impact on the look and feel of your home. It is an essential component of updating and renovating your home. Some carpet installers will remove your old carpet for free. But if they don’t, you might be looking at an additional charge of $200-$600 on average for an average-sized room. Save money by removing carpeting yourself.
Tools needed:
Safety glasses
Knee pads
Pliers
Pry bar
Hammer
Utility knife
Duct tape
Floor scraper
Large magnet
Step 1: Remove doors and clear the room
Remove any doors that swing into the room, including closet doors. Then clear the room, taking out all furniture. Do not try to remove carpeting with furniture still remaining. It is best to clear the room completely.
Step 2: Pull carpet from tack strips
Tack strips hold the carpet in place along the walls. Start in a corner and grab the carpet with your pliers. Once loosened, you can pull the carpet by hand. Work along the wall to pull up the carpet. If you are removing carpet from stairs, start at the top and work your way down.
Step 3: Cut carpet into smaller pieces
Once you have a section loosened and pulled up, use your utility knife to cut the carpet into smaller pieces. You can create small rolls of carpet for easy removal.
Step 4: Remove carpet pad
After the carpet is pulled up and removed, repeat the process for your carpet pad. Cut it into smaller pieces for easy removal.
Step 5: Inspect the tack strip
You can leave the tack strip in place for your carpet installer to inspect. These strips can often be reused if they are intact and not damaged or rotting. If you do need to remove the tack strip, use your pry bar to pop it off the floor.
Step 6: Remove carpet staples
Pull remaining staples using your pliers. If there are many staples, run a floor scraper over the area first to loosen and push up the carpet staples. Run a large magnet over the floor to catch any stray nails, screws, or carpet staples.
For a more in-depth look at carpet removal, read our blog "How to Remove Carpet"
Plan for Disposal of Your Demo Waste and Debris
Any demo project will generate lots of trash and debris. Many residential trash companies will not take large amounts of demo waste. Your best bet is to rent a roll off dumpster container. Having a dumpster on-site lets you toss your demo debris as you work. This keeps the trash from piling up, which is inconvenient, unsightly, and potentially unsafe. You may not know what size dumpster you’ll need. When you call your rental dumpster company, the customer service representative will go over your job with you and help you determine the right size for you. You can usually keep a rental dumpster for a week or more. This typically gives you plenty of time to get your demo done. But if you need more time, you can extend your rental period.
Final Thoughts: Completing Your Demo Projects
Demo work can be very messy. Even as you're cleaning as you go, there will still be some work to be done at the end of your project. Before immediately starting on the remodeling work, make sure you’ve removed all of the dust and debris from the work area. Before tossing demo debris, check to see if any of the material can be reused or recycled.
Completing demo work leaves you with a blank slate. You'll have the opportunity to create a room to suit you and your family with your own design touches. With the money you’ve saved by demoing yourself, you’ll have more in your budget for remodeling.
Have fun with the demo process. Work safe, and look forward to the updated home you’re about to create!
Table of Contents Why Build a Privacy Fence? Top 7 Privacy Fence Ideas 1. Wooden Fence 2. Metal Fencing 3. Bamboo Fence 4. Vinyl Fence 5. Chain-Link Fencing 6. Brick or Concrete Fence 7. Natural Fence Privacy Fences Add Utility and Value In the poem “Mending Wall” Robert Frost wrote, “Good fences make good neighbors”. […]
Table of Contents How Does Bidding Work? How to Successfully Bid a Roofing Project 1. Thoroughly Assess the Roof 2. Understand the Scope of the Job 3. Take Good Measurements 4. Determine Materials Costs 5. Calculate Labor Expenses 6. Add in the Extras 7. Agree On a Clear Timeline 8. Watch Out for Overhead Costs […]